XBMC Live 10.0 on a Zotac ZBOX HD-ND02 linked to OpenFiler VM media library

February 27, 2011

Introduction
During the previous post I described my CD-to-FLAC project. The purpose of that project is two-fold: 1) create a digital, loss-less backup of all our existing CD collection, and 2) be able to access this mountain of media and play it on our main stereo system. I was already looking to possibly replace my aging Harmon Kardon AVR20 (a great little product that has served me well for sixteen years), so a receiver with media-serving capabilities would be a plus.

What I discovered was that the media capabilities of the receivers (at least in the sub-$1k range) left a lot to be desired. The Onkyo I initially gravitated toward had a text-only interface, and would have required way too much scrolling through lists. I dropped down one notch in the product line, eventually deciding on the Onkyo SR-608. This model offered 1080p video-switching, a ton of inputs, and quality sound/video. The difference in costs of the two models would be used to pay for a proper media-serving option.

There are many plug-and-play options out there for serving and/or playing your media: Squeezebox, Popcorn Hour, and Boxee, to name just a few. Although these were popular choices, I quickly decided that a “more flexible” alternative was necessary. By flexible, I meant “build it yourself”.

The Atom processors had spawned Netbooks, and were now being used in “nettops“. There were now small nettop boxes that were being used in home theater applications. I just needed to find one that met my needs. A buddy pointed me to XBMC for the frontend. There is even a live version of XBMC which wraps a Linux-blanket around the app, and makes it a standalone OS product. The XBMC forums often recommended the Zotac ION products. After additional research, the ION/XBMC path seemed the best solution for my situation. Small, very low power, able to play high definition content without problems, and a wealth of threads discussing it. It certainly sounded like a winner.

Hardware
After a little more research, I decided on the Zotac ZBOX HD-ND02. It came without harddrive or RAM. The Muskin 2GB stick of RAM looked nice, and the forums liked pairing solid state devices (SSDs) with the Zotac/XBMC combination. According to them, it made moving through large lists much, much quicker than from a standard, spinning harddrive. This made sense, so I grabbed a 16GB SSD, too (it was a Newegg combo with the Zotac). The 16GB would be plenty as all the media would actually be located elsewhere on the network. Finally, this PC would be headless and not visible, so I’d need a remote to control it. The MCE remotes work with XBMC right out of the box, so I chose the AVS Gear GP-IR01BK.

Next up, I needed to get the XBMC Live onto a bootable USB thumbdrive. The Zotac does not have an internal CD and I’d need a way to install the OS.

XBMC Live
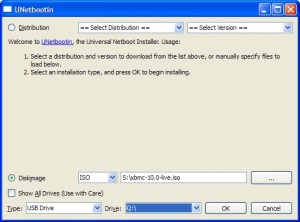
I downloaded XBMC Live 10.0 “Dharma” ISO from the XBMC site. To create the bootable USB, I turned to UNetbootin. This handy little utility can run on my XP machine, and will take an ISO image and quickly generate a bootable USB thumbdrive. I just inserted a spare USB drive, and pointed the application to it and the ISO location. Click OK, and let it perform its magic. When it is complete, don’t click Reboot Now.

UNetbootin install

UNetbootin all done

The Zotac
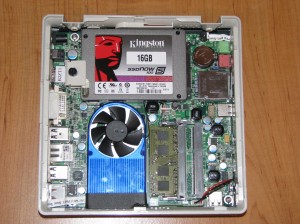
Setting up the Zotac was a breeze. I installed the RAM, the SSD, and that was it. The interior of the Zotac was nice and compact, but easy to work in.

Interior of the Zotac ZBOX

I connected the all the cables. Once it was powered on, pressing Del took me to the BIOS. Several settings needed changed and, of course, I wrote none done. Memory serves that ACHI was enabled, hardware graphics was set, and set the initial boot device to USB. 512MB (from the default 256) of memory was assigned to video.

I saved all the BIOS changes, plugged the USB drive in, and rebooted the machine.

Install XBMC Live
The machine quickly posted and the menu came up. I selected to install it to the HD. I kept all the default settings throughout the install, and selected an appropriate username and password. Once done, I removed the USB drive and rebooted. This process was exceedingly simple.

Configuration
You can configure (almost) everything in this release of XBMC from the graphical interface. I understand that previous releases required some tinkering “under the hood”, so it was fortunate I picked this release to work with.

Everything can be tweaked. I stuck with the basics in mine: zipcode for the weather, and adding media sources. Music was one path, movies was a combination of two (MKV one, and .avi storage for the other), and TV shows was another. This would work for me begin with.

Once I was satisfied all the shares were mapped, I powered down the device, unhooked everything, and took it to its final resting place, the main living area.

Testing it all out
The first thing that I noticed was that the screen was missing some vital information. The screen resolution was set at 1280×720 (my TV is 720p) but not all the user interface was visible (in fact, much was off the screen). It took me a few minutes to find the video calibration tool. It is at System -> Settings -> System -> Video Output -> Video Calibration. Be sure to step through all the screens. This fixed my issue.

My initial reaction was how peppy everything was. Moving from screen to screen was as quick as it should have been. Quite nice. Once I went to test a CD, it became apparent there was no audio. A quick Google search showed this is a common problem. To fix this in XBMC Live version 10.0, I simply went to Programs, ran the audio mixer plug-in, and unmuted all the channels. I had already set the audio output to HDMI in the system settings. Suddenly we had wonderful sound.

My wife came into the room and immediately commented upon how nice the system sounded. She was hooked.

Final thoughts
We have been playing with the Zotac for about three weeks and are greatly enjoying it. The sound quality from it though the Onkyo has been amazing. We had been listening to compressed music (eg: MP3s) for so many years on inferior PC 3-ways, it was eye opening to hear CD quality sound once again, and on a quality sound system. The convenience of having all the CDs available from the couch cannot be overstated. The only downside: my wife has trouble deciding what she wants to listen to.

I was initially concerned with only ordering 2GB of RAM. This ended up being a non-issue. The Zotac spends most of its time using less than 300MB of memory.

CPU utilization ended up being less than expected. Idling, it uses just 26% of the capacity, not much more when playing media. It seems the video chip does its job very well, leaving the Atom relatively unstressed.

I plan to spend time in the coming weeks poking around more in the XBMC settings and menus. There is an incredible wealth of options available, but the beauty is that you don’t need to dig in very far to have a fully functioning system. My next few posts will dig a little deeper into XBMC and my setup.
5


Ripping CDS to FLAC using Vortexbox in a VM connected to OpenFiler NAS

February 10, 2011

My project the last several weeks has been to rip my CD collection to FLAC. This is so I have electronic backups of all my music, as well as to allow it to be easily played on the sound systems in the house. My previous post described how I set about ripping. This post will discuss my experiences as the project progressed.

Vortexbox as a virtual machine
Having the Vortexbox virtual machine use my primary machine’s CD drive as input, and have the vm doing all the heavy lifting turned out to work great. I simply kept a stack of CDs to be ripped on the desk and, as each CD was spit out by Vortexbox, the next one in line was slapped into the tray and closed. The length of time to process each CD varied on CD length. The classical discs took the longest, generally in the 20-24 minutes range. The (shorter) rock CDs often took less then 14 minutes. The length of time did not bother me in the least. I knew the output would be the best quality it could be, and that this was the last time I’d have to touch the CD.

On the rare occasion, Vortexbox would spit out a disc just a few seconds after it was fed in. In every case, just closing it again was enough for it to accept the disc. Other than that nit, the ripping/encoding process “just worked”. The virtual machine rarely used much of the two CPUs allocated (a combined maximum of 1750Mhz when encoding), and rarely used more than 100MB of memory. I would 100% recommend it to anyone looking to rip their personal music collection.

Cover art
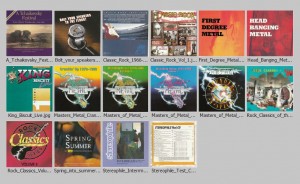
After Vortexbox rips and encodes each CD, it goes out to the Internet to attempt to find the correct cover art for the album. My experience was that it did a fairly good job but it did make mistakes, and sometimes returned no image at all. Some of the missteps can likely be attributed to the age and my specific CDs. A good portion of my music is from the late 80s through mid-90s, and some of it just is not popular enough these days to have images on Amazon. The rock compilations suffered the most; Vortexbox found almost none of them. This was often due to the fact there just were no hits on Google for these albums. I ended up just scanning the covers myself, and creating 500×500 images and placing them in the correct folders. I did this on about thirty discs (some of which are shown below). It wasn’t the perfect solution but was good enough.

Some of the missing cover art I scanned in

In some instances, the cover art that was found was quite small. Rather than hunt through all the folders manually, I turned to another piece of software to do the searching for me.

BlissHQ
I used BlissHQ running on a Windows 2003 server virtual machine to hunt down cover art that was missing, or was too small (I chose 300×300 as the minimum desirable size). I discovered this software when hunting down methods to efficiently rip my music collection. His excellent three-part discussion of his “Vortexbox as vm” solution was what got me to where I am today. I have communicated with Dan (the developer) a bit during this process and he is a nice guy to deal with, quick to respond and helpful.

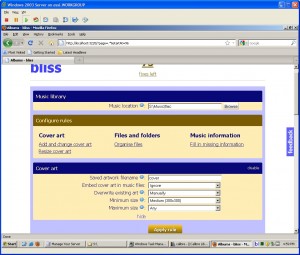
BlissHQ was an easy install, and uses a browser as its interface. You can select the settings for a ‘rule’, and then apply this rule to your collection. It can make changes automatically, or allow you to manually make changes (which is what I did). For instance, my rule was that the image sizes had to be at least 300×300. Once you apply (run) the rule, the application will spin through your collection, determining which albums meet your criteria (compliant) or do not (uncompliant). This took a while but when it completed, I could choose to view only the uncompliant albums and go about fixing them. This was done by either 1) clicking on the album name, and finding more artwork, or 2) clicking the little pencil icon you see as you drift over the album. This triggers Bliss to hit the Internet and give you some other artwork options. See one that is better than yours, and you select to use it instead. Most of my replacements ended up coming from Google.

Bliss allows for trial use, but is fee-based after that. It will make changes to 100 items for free for you to test out its functionality. Anything beyond that and you’ll need to purchase “fixes”, either in batches of 1000 or a unlimited license. The unlimited license fee is reasonable and I could see most people opting for that.

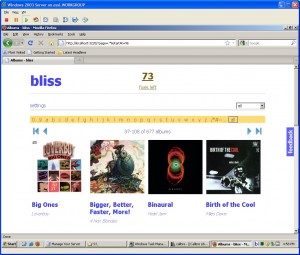
blissHQ screen

I initially had some issues with the product (the browser would just chew up the CPU and the GUI appeared broken) but it turned out IE6 was actually the problem. Dan replied to this post and pointed me in the right direction. I installed Firefox 3.6 and my Bliss experience was completely different. I like it. It displays twelve albums per page, and you can scroll through them fairly quickly. In about twenty minutes I had gone back through my collection and made the couple changes that had been needed. Bliss is a good product and well worth a look.

blissHQ: my rules

Filename cleanup and the Various folders
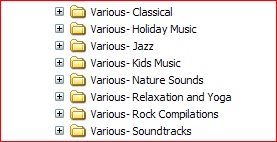
The names of folders generated by Vortexbox during the ripping process resulted in some confusing situations. Classical discs were one example. CDs with Mozart’s music might have Mozart somewhere in the title, but often the title included the orchestra instead. This would have led to confusion and a mess. To make things easier, I created a number of Various folders. Various- Classical, Various- Kid’s Music, Various- Jazz, Various- Soundtracks, etc were created to make hunting down music a little easier. This has proven to be a great help.

Various categories

Backups
Anyone who knows me knows I preach “backups, backups, backups”, preferably automated. Although I did discuss how I backed the music up in the previous post, it bears repeating.

On the backup machine, I created a folder named Music Backups on a drive that had about 500GB free. Beneath that were placed the flac and mp3 folders. Next, a simple batch job was created on that PC, that would use XCOPY to move any new files from the OpenFiler share to this newly created path. The XCOPY statements I used were:

xcopy "s:\Music\flac\*.*" "L:\Music Backups\flac\" /s /k /d /y
xcopy "s:\Music\mp3\*.*" "L:\Music Backups\mp3\" /s /k /d /y

The batch job was set up as a scheduled task to run each morning at 2:30, a time when I am busy sawing logs.

I still need to create a backup to external media and get that copy moved offsite to be fully protected.

Nearing completion
I still have a batch of classical CDs to rip but for the most part this project is done. It was a long road to get to this point but it is for the better. Technology has improved greatly since I started ripping in 2006. Virtual machines were basically unheard of back then, and now that is how this media is being served. Storage costs are much different as well; 300GB back then was certainly different than today.

The main goal of this project has been met: To be able to listen to all of our CDs (in glorious lossless format) on our main stereo setup, with future expansion to other rooms a trivial process. In addition, we now have a true backup of all our music.

I’ll describe my receiver upgrade and media HTPC setup in the next post.

5

Vortexbox music server in an ESXi VM hooked to OpenFiler

January 18, 2011

The story
About four years ago I got started on a project to rip all my music CDs to FLAC. About seventy albums in, that project got put on hold. We moved the study from our spare bedroom to the basement when our boy arrived, and the CDs got scattered into numerous dark recesses of the basement. It is now the winter, prime time to clean out the closets in the house as well as continue the ongoing organization in the basement. A couple weeks ago I got the urge to hunt down and organize all the CDs. This was in part due to my wife having received a new MP3 player for Christmas and she has been eager to put more music on it. We had ripped some MP3s years back but not much she was in the mood for now. So it was likely time to restart the ripping process, with my wife selecting what ones to do first.

[Sidenote: I found some great stackable bins by Homz at the local Walmart that hold 30 discs each. These made quick work of organizing the rock discs alphabetically. I now have them all in one location on our ‘wall-o-shelves’, stacked and neatly labeled. All the classicals found a home in a grapefruit case. Hey, it works.]

Ideally, I wanted to touch each disc only one more time before packing it away for good; I would want it archived in FLAC lossless format as well as a higher-bitrate MP3 for my wife’s player. The FLAC would future-proof me for when I eventually get a high quality media player. I initially figured I would have to rip each one to FLAC manually and then run a script to convert the FLAC to MP3 and place it in a different folder. I did a few cursory web searches, and then put it on the mental back burner for about a week.

Vortexbox
Late last week I happened upon Vortexbox. The product is a standalone operating system , running a modified version of Fedora Release 14. It is free, and is downloaded as a 635+MB ISO. From their site:

    VortexBox is a free, open source (GPL v3), quick-install ISO that turns your unused computer into an easy-to-use music server/jukebox. Once VortexBox has been loaded on an unused PC, it will automatically rip CDs to FLAC and MP3 files, ID3 tag the files , and download the cover art. Vortexbox will then serve the files to network media players such as Logitech Squeezebox, Sonos, or Linn. The music files can also be streamed to a Windows or Mac OSX system.

What really caught my eye was that it was a “complete OS“. Which meant it could run as a virtual machine on my ESXi box and not consume any resources on my primary machine. A few brief searches later confirmed people were doing this very thing, and that you can redirect the music folders to a NAS or SAN device. In my situation, that would be OpenFiler. The final item that sold it was that I could use the CD drawer on the client machine to rip from, as the VMWare server is on the far side of the room, up on a shelf. Not exactly a convenient location when one plans to rip another 100+ CDs.

I was sold. Now it was time to get it installed and running.

Getting started
I began by downloading the ISO from the Vortexbox site. The file was then uploaded to my ESXi datastore.

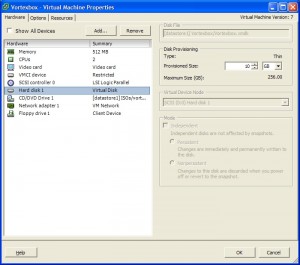
I created a new virtual machine with a 10GB boot drive, 512RAM and two vCPUs. I knew that the encoding would benefit from dual processors. I pointed the CD drive to the ISO I had just uploaded, and started up the machine.

Vortexbox vm settings on ESXi

The GUI interface is accessed from a web browser. You’ll need to know what IP address the vm was given when it started. As this could vary each time it rebooted, I decided to make the ip address static. I opened the VSphere Vortexbox console and then followed the excellent instructions on the Vortexbox site. Now the ip address is static.

The FLAC and MP3 files were going on OpenFiler, so I created a new folder, Music, on my OpenFiler CommonStorage share, with two folders beneath, flac and mp3 (note the case of the folder names).

new Music folder on OpenFiler

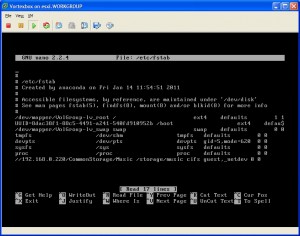
Vortexbox has locations it assumes the FLAC and MP3 files will be. I wished to redirect these from the 10GB boot drive to the new OpenFiler shares. To do this, I needed to connect to the Vortexbox console again and edit the fstab file. This will have the share automatically mount at boot. I found how to do this on the Vortexbox forums.

nano /etc/fstab

I then added the following line:

//192.168.0.220/CommonStorage/Music /storage/music cifs guest,_netdev 0 0

This line pointed the default music folder (/storage/music) to my newly created Openfiler share (//192.168.0.220/CommonStorage/Music). I saved and exited the fstab file.

ftab entry for Vortexbox

I manually mounted the path:

mount /storage/music

Now the default paths pointed to my OpenFiler shares. This was a much simpler process than I had originally feared.

The OpenFiler shares did need more space allocated to them. I added more space to the OF volume, and bumped guest quotas up, to allocate another 150GB to the shares. This gave me plenty of room for the existing FLAC files, and likely enough space for the rest of my CD collection. If not, I will just repeat the process to make more space available.

Next, I moved the FLAC folders to the S:\CommonStorage\Music\flac\ path. This was projected to take a while so I just started the copy, and left to do other things.

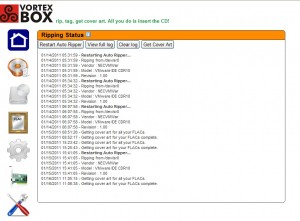
Once the task completed, it was time to get all the cover art. This process is almost too simple to believe. Go to the browser’s GUI interface, and click on the second icon from the top. On the CD ripping status and cover art screen, simply click on the Get Cover Art button and let it do its thing. It did not take very long, and ended up with a cover for almost every album.

Vortexbox CD ripping status and coverart

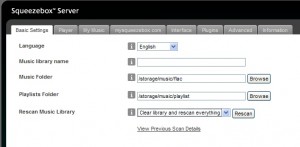
Now that the cover art was in place, it was time to let the Squeezebox server scan the flac folder and build its tables. I selected Clear and rescan for changes from the drop down box, and started the scan. This was another good time to walk away to find something else to do for a while.

Manually clear and rescan for FLAC changes in Squeezebox

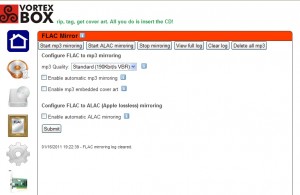
Finally, it was time to create MP3 mirrors of all the FLAC files. I clicked on the FLAC mirror icon (very cute) to take me to the mirror screen. I kept the bitrate at the standard 190Kbits VBR, and clicked Start mp3 mirroring. This ended up being the longest process. That made sense as it was having to encode over 4,500 songs. Just walk away and let it work. We had some places to go for most of the day, and the process was complete when we returned. All the FLAC files had MP3 copies. Sweet!

Vortexbox FLAC Mirror

Setting up the Backups
Now that everything was setup and working, I needed to ensure it was backed up initially, and going forward. This is a critical step to ensure all my hard work didn’t just go to waste with a hard drive failure. I needed to backup the FLAC and MP3 folders nightly, as well as back up the Vortexbox vm a couple times a week (this would be plenty). The vm wouldn’t have to be backed up due to how easily it was installed, but setting up the backup would be a five minute operation and could potentially save me many times that.

On the backup machine, I created a folder named Music Backups on a drive that had about 500GB free. Beneath that were placed the flac and mp3 folders. Next, a simple batch job was created on that PC, that would use XCOPY to move any new files from the OpenFiler share to this newly created path. The XCOPY statements I used were:

xcopy "s:\Music\flac\*.*" "L:\Music Backups\flac\" /s /k /d /y
xcopy "s:\Music\mp3\*.*" "L:\Music Backups\mp3\" /s /k /d /y

The batch job was set up as a scheduled task to run each morning at 2:30, a time when I am busy sawing logs.

I created a new ghettoVCB job, and another batch file (on the backup machine) to call it. I scheduled this to run later in the night twice a week.

Before I called it a day, I fired off both tasks manually just to get the initial backups started.

VMWare Tools
You will need to install VMWare Tools within Vortexbox to be able to rip CDs from the client CD drive. I found an excellent post that worked perfectly. No reason rehashing it; just go read the post for the details.

How to rip from the client’s drive
I have had time to test rip two CDs. What I had to do to get it to work was change the device type of the CD to Client.

Vortexbox change CD drive to client

After receiving an error when attempting the initial rip, I had to also change the CD mode to Passthrough IDE (Recommended).

Passthrough IDE on ESXi

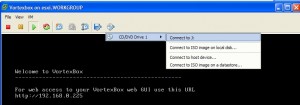
Lastly, I connected the CD drive on the Vortexbox console to my primary machine’s J drive (its CD tray). I put a music CD in the drive, and Vortexbox took off.

Connect to J Drive

It took 10 minutes to rip the disc, and two minutes to encode. It also went out and grabbed the artwork for me at some point in the process. When it was done ripping, Vortexbox opened the CD drawer for the next disc. Very slick and simple.

When you are finished your ripping session, be sure to disconnect the client’s drive from the Vortexbox VMware console. This is rather important.

Ripping Folder Structure
Something I noticed after ripping the first disc was that the folder name was not what I expected. It was in a artist-album/title.flac format, rather than the artist/album/title.flac I was expecting. A quick web search discovered how to solve this issue. According to the Vortexbox forum thread, you need to:

    1. Log into your VortexBox as root.

    2. Edit /etc/ripit/config, and change

    dirtemplate="$suffix/$artist – $album"

    to

    dirtemplate="$suffix/$artist/$album"

This worked for me, and the second disc was ripped to the correct folder name.

Summary
Vortexbox looks to be the solution to my storage and ripping problems. It was pleasantly simple to install as a virtual machine and get set up. The Vortexbox forums provided some excellent help for the complicated pieces (VMWare Tools install would not have been just a ten minute affair otherwise). The Squeezebox server that comes installed will be fun to play with as I get time. I have also been scoping out potential home receivers and Vortexbox having a DLNA server included looks to be a very important feature.

Give it a try if you have a bit of time. All said, I spent about four hours from start to finish installing, configuring, hunting down solutions, and setting up the backups. Now I can rip the remainder of our music as I have time.

0

Rosewill RV350 350W Power Supply and my Backup Server

November 12, 2010
Tags:

The external drive
I have had an external harddrive on my desk for a number of years. It is a 320GB Western Digital drive in a Rosewill case. It used to store data backups but as my storage needs grew, and I consolidated my various externals into a single backup machine, there is rarely a need to turn it on these days.

Looking at the poor, unused drive a few weeks back made me wonder if I had room to put it into my Windows backup machine. That headless PC currently has a CD drive, three IDE and one SATA drive. There was room, but I would have to shift things around. The CD got lowered to the bottom slot, and the new addition was placed next to the 1TB Samsung green drive in the external 3.5″ bay. Everything was hooked up, and then it was time to boot it up. I pressed the power button, got an initial hum, then nothing more, save for the power light flashing at me. I flipped the back power switch off, checked all the connections, and then tried again. Still nothing. I reasoned I had a 350 watt power supply in there so that should be plenty. I tried again, and it did boot. Success! I let it finish booting, then VNCed in and restarted the machine. Wouldn’t boot.

I dug out my handy Kill a Watt load meter and connected the machine’s plug to it. The machine idled at 110 watts, significantly less than 350. At initial power up, the machine did spike at 194 watts. I powered it back down, reconnected the fifth drive, and restarted. The machine spiked at 209 watts, an increase of 15 watts for that fifth drive. Once it fully booted, the idle load was 8W higher. Out of curiosity, I hit Newegg for the Rosewill’s specs. It appears that the power supply is rated at a “minimum of 60% efficiency at peak load”. Some quick math (350W * .6 = 210W) showed that I was requesting right at what the supply was rated for.

My thought was that this machine had been rock-solid with the existing configuration for the past four years, and now was hit and miss on boot with a fifth drive. Long-term stability seemed to be uncertain, so I powered it all down, and pulled out the drive.

I briefly considered ordering a new power supply, either a standard one with higher capacity or another 80+% efficiency model my last two machines have used. The frugal side of my personality won out; I could darn near buy another 1TB drive for the ESXi box for the price in would take to replace a perfectly functioning power supply, just to have the 320GB drive off my desk.

Further research showed that power supplies do ‘age’ over time and lose some of their efficiency. Another tidbit I found out there was is a strong correlation between weight of the PSU and the quality of it. The reasoning is that quality components just weight more. I saw that the Rosewill weighed 1.8 lbs, and the Antec used in my quads weighed 3.6 lbs.

I am posting this for the dual-purpose of showing that a entry-level 350W power supply can successfully run an XP1900+ build with four hard drives, but also that that is about its capacity. I fear a fifth drive would induce some eventual failure in another component, and that would not be good. Despite ending back where I started in the process, this was a good exercise to go through.

Update
I’d had need to reboot this machine several times in the last week, and the PC would not start consistently. Just a hum, and then the flashing power light. Apparently the power supply was on its last legs. The Antec Earthwatts 380W Green power supply was ordered and replaced it. I was able to install the old external drive into the case, and the PC now idles at 102 watts. The initial spike of 172 watts is also much lower than the 209 of the Rosewill. This new supply is also quite a bit quieter than the old.

0

Multiple vCPU encoding performance in ESXi 4.1

October 9, 2010

Background
This is a continuation of my post about vSphere 4.1’s new Power Policy settings. This post will look more closely at how adding additional vCPUs to an encoding process can impact its performance, and whether the power settings make that big a difference on a more heavily-loaded system.

An excellent document on the vSphere cpu scheduler performance can be found on the VMWare site.  Another one, Determining if multiple virtual CPUs are causing performance issues, is worth a read as well.

Power Policy Settings
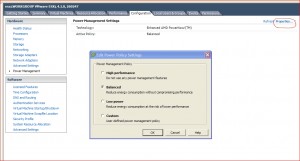
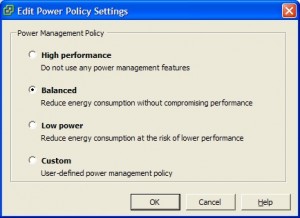
The Power Policy settings can be reached from the VSphere client;  Configuration -> Power Management -> Properties.

Power policy settings in vSphere 4.1

Power Policy Settings

Testing Performance
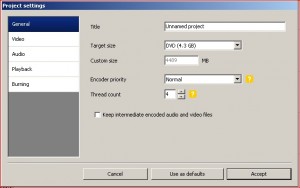
I used nineteen AVI files of my children playing soccer to feed DVDFlick, and created an AVI file as output. The input files were on the OpenFiler virtual appliance, and the output went to a partition on another local drive. This was to eliminate disk contention from the equations. I set DVDFlick’s encoder priority to Normal, and the tests were run on a Windows 2003 Server virtual machine. DVDFlick will effectively use any amount of CPU cores made available to it, so I ran the test using one through four vCPUs. DVDFlick also allows you to select how many threads to run with, so that was varied during the run as well.

DVDFlick Project Properties

I originally did not plan to not test with more than two vCPUs as my server has only four cores, but decided to give it a go while everything was set up. I would not normally allocate more than two vCPUs to any active vm on my VMWare box as it would negatively affect the other active vms. But this was a test, so all four were included in the results.

I ran each test twice and averaged the two runs until it was apparent that each set varied by no more than a few seconds of each other. At that point, I decided only one run per set was needed. The results gave me some nice data for comparing the three settings.

The Power Draw column indicates the average draw during the encoding phase. It is provided as a relative value for comparisons.

High Performance setting
vCPU Count Power Draw (Watts) Time
(1 thread)
Time
(2 threads)
Time
(3 threads)
Time
(4 threads)
1 114 29:09 29:35
2 124 23:11
3 123 23:39 20:57 22:21
4 125 24:32 22:12 20:37

Balanced setting
vCPU Count Power Draw (Watts) Time
(1 thread)
Time
(2 threads)
Time
(3 threads)
Time
(4 threads)
1 112 29:20 29:50
2 122 23:29
3 124 24:28 21:42 22:53
4 127 24:54 22:01 20:54

Lower Power setting
vCPU Count Power Draw (Watts) Time
(1 thread)
Time
(2 threads)
Time
(3 threads)
Time
(4 threads)
1 113 30:09 30:41
2 123 26:20
3 121 27:51 24:52 26:20
4 125 28:01 26:00 23:53

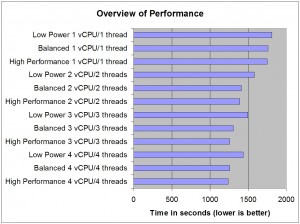
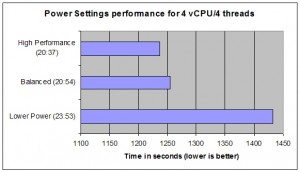
Overview of performance by power settings and vCPU count

Initial observations
The power usage varied little between the three options when the test was running. The charts also show that going from one to two vCPUs to the virtual machine increased the total by just 10W in each case, and each subsequent vCPU only a couple more watts.

Anytime more threads were used than CPUs allocated, performance suffered. This is not a big surprise, and even DVDFlick cautions against this practice. Performance suffered equally when you went the other direction; running with fewer threads than cores. Obviously, you would want to run with the same number of threads as cores.

Power usage was effectively the same across all the settings when encoding. I would have expected ratios more resembling the idle stats, but that is why I ran these tests.

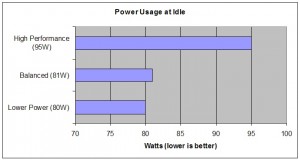
Power Usage at Idle

Encoding times for the Balanced setting were very close to that of High Performance, most within 1%. VMWare states the Balanced setting “reduces energy consumption without sacrificing performance.” From my tests, this statement is 100% true.

The Lower Power encoding times were quite a bit slower than the other two settings. Four cores/four threads took three minutes longer (12.5%) to complete than the other two settings, but this was what VMWare cautions would occur. These results suggest there is no compelling reason to ever use this setting. There was almost no difference in power usage but imparted a huge performance penalty.

Power Settings Performance

Four threads/four vCPUs was a third faster than one/one on Balanced and High Performance settings.

Comparisons to my Desktop
While in the mood to test, I ran two benchmarks on my desktop. That machine runs XP on a Q6600 Quad-core with 4GB installed. I rebooted the machine first and didn’t open anything additional post-boot. The same test bed was used as above.

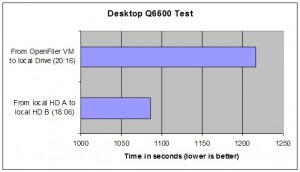
Desktop test results

The first benchmark, from OpenFiler virtual machine to a local drive, was almost exactly the same time as through the Server 2003 vm using either Balanced and Performance settings. I was very pleased, until I saw the results from the second test. Local drive A to local drive B was quite a bit faster on the desktop. The 2003 vm should have been doing almost the same thing. Now I needed to test the vm using input and output partitions on two separate physical drives in the ESXi box, and skip OpenFiler altogether. By eliminating OF from the equation, we’ll see if that was the bottleneck.

Removing OpenFiler as input source
I changed the drives to be on 10GB partitions within the two local drives; a Western Digital WD6400AAKS and a Samsung F3 HD103SJ. I used all four threads on the four vCPU virtual machine. I, again, ran each test twice and averaged the scores. The target drive was swapped for the second set.

MS Server 2003 VM; 4 vCPU/4 threads
Balanced Power setting
From local 640 to local 1TB From local 1TB to local 640
17:22 17:43

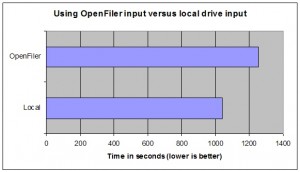
OpenFiler input versus using local input

By eliminating OpenFiler, we reduced runtime by 3-1/2 minutes! This was another result I was not expecting. I will have to investigate this further in the future.

Conclusion
Using multiple vCPUs for virtual machines that can take advantage of multiple threads can definitely increase performance. Going from one virtual CPU to two in my tests showed the “biggest bang for the buck”. It bears repeating that there were no other virtual machines contending for resources during my testing. If there had been, the outcome might have been affected.

I have vSphere set to the Balanced Power setting. It reduces my power utilization by 15% during all the time it is idle, and does not sacrifice any performance.

0

Power Policy Settings in vSphere 4.1

October 7, 2010

The new Power Policy Settings in ESXi 4.1
Since the upgrade to VMWare’s ESxi 4.1, I have been curious as to how the newly added power policy settings would affect both system power usage and relative performance. This short post will look at how the various power settings affect my specific setup during idle time, with a follow-up post looking more closely at power usage and performance during a typical video encoding job.

These new settings can be reached from the VSphere client;
Configuration -> Power Management -> Properties.

Power policy settings in vSphere 4.1

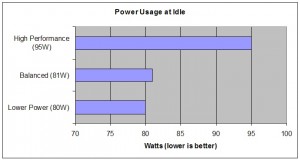
Power Usage at Idle
I began my testing by checking the top three settings at idle. (I decided not to even mess with the custom settings.) The ever useful Kill A Watt load meter was used to measure the server’s power draw. The beauty of these settings are they can be changed on the fly, and the effects seen immediately.

Power Policy Settings

Results
As you can see in the chart below, the Balanced setting reduced the power usage by almost 15%. The Low power setting didn’t appear to make any further savings. In my specific situation, where the machine will be essentially idle 95% of the time, saving 15% is a big deal. I have the server set to Balanced now, and will enjoy the feeling of saving a few cents an hour on the power bill.

Power Usage at idle

My next post will look at power utilization during a test video encoding job, as well as testing how much adding addition vCPUs to the virtual machine affects performance.

0