Upgrading from ESXi 4.0 to 4.1
Introduction
In July VMware released a new version of vSphere client and ESXi. I finally got around to seeing what is new in 4.1. Many of the new or enhanced features either did not impact me, or required vCenter (read: $$$$). However, there were some excellent features that did catch my eye:
- Performance and Scalability Improvements. New optimizations have been implemented for AMD-V and Intel VT-x architectures, while memory utilization efficiency has been improved still further using Memory Compression. Storage enhancements have led to significant performance improvements in NFS environments. VDI operations, virtual machine provisioning and power operations, and vMotion have enhanced performance as well.
- Reduced Overhead Memory. vSphere 4.1 reduces the amount of overhead memory required, especially when running large virtual machines on systems with CPUs that provide hardware MMU support (AMD RVI or Intel EPT).
- Memory Compression. Compressed memory is a new level of the memory hierarchy, between RAM and disk. Slower than memory, but much faster than disk, compressed memory improves the performance of virtual machines when memory is under contention, because less virtual memory is swapped to disk.
- Configuring USB Device Passthrough from an ESX/ESXi Host to a Virtual Machine. You can configure a virtual machine to use USB devices that are connected to an ESX/ESXi host where the virtual machine is running. The connection is maintained even if you migrate the virtual machine using vMotion.
- vCLI Enhancements. vCLI adds options for SCSI, VAAI, network, and virtual machine control, including the ability to terminate an unresponsive virtual machine. In addition, vSphere 4.1 provides controls that allow you to log vCLI activity.
This short list of improvements was enough to decide to do the upgrade to the ESXi installation and the vSphere client running on my Windows box. The remainder of this post explains exactly how I performed the upgrade.
Preparing for the Upgrade
The first thing I did was pull down the PDF document vSphere Upgrade Guide, and printed it out. I read through the applicable portions of the document to get an understanding of what the upgrade entailed.
Per the guide, I backed up my ESXi settings using ESXi Configurator. I connected to the host, and then backed up the configuration to my Windows machine. While I was backing things up, I went ahead and backed up (again, to the Windows machine) the smaller-sized VMs. OpenFiler’s boot drive was already backed up, so I was covered there.
One of the new features was decreased memory overhead. I wanted to have the ability to have before-and-after statistics, to see just how much my installation was impacted by the upgrade. I stopped all the machines that were running, then restarted them to eliminate any possible virtual machine memory leaks. Then I printed several applicable vSphere screens for the before conversion, base-line numbers. I plan to detail my observations on the improvements in a future post.
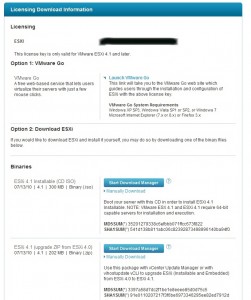
Visit the ESXi 4.1 Downloads page. Be sure to log onto the VMWare site before going to the download page. If I didn’t do that, I would receive the error “Sorry, at the moment you are not authorized to download VMware ESXi 4.1 Installable”. Download ESXi 4.1 (Upgrade ZIP from 4.0 to 4.1), VMWare vSphere Client 4.1, and VMWare Tools for Linux clients. I renamed the upgrade zip to ESXi41_upgrade.zip to save me typing later on.
Upgrade ESXi to 4.1
The following are the steps that I followed. They are modeled after the instructions here.
- Power off all the VMs.
- Place the ESXi host in Maintenance Mode. Do this from the vSphere client. Right-click on the server host in the Inventory, and select Enter Maintenance Mode.
- Launch the vSphere CLI by navigating to Start –> All Programs –> VMware –> VMware vSphere CLI –> Command Prompt.
- Type  cd bin.
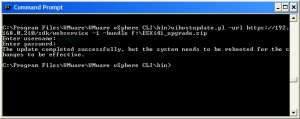
- Enter the following syntax : vihostupdate.pl -url https://ipaddressofesxiserver/sdk/webservice -i –bundle pathtodownloadedzipfile. In my case, the string was “vihostupdate.pl -url https://192.168.0.210/sdk/webservice -i -bundle f:\ESXi41_upgrade.zip“.
NOTE: I discovered you cannot cut and paste this command into the CLI DOS prompt. You must type it in. I spent an hour scratching my head until I came across this post. It was a lifesaver! - Provide the administrative account username and password when prompted.
- After the install completes (it took about five minutes for me), reboot your ESXi Host.
- After your host comes back up exit Maintenance Mode.
Now that you have now updated your ESXi host from 4.0 to 4.1 you should update your vSphere Client, CLI versions and VMTools to 4.1 as well.
Upgrade vSphere
Simply run the installer. It will only take a few minutes. Then fire it up for the next step of upgrading the tools.
Upgrade VMTools
ESXi 4.1 also came with a new vmtools installation, which I applied to each of my virtual machines. I applied it automatically to the Windows clients. I uploaded the vmware-tool-linux ISO to the datastore, and connected it to each Linux VM in turn, then powered them on. I followed the instructions on the VMWare site.
Conclusion
That was all that was needed to upgrade ESXi to 4.1. If I had initially typed the CLI vihostupdate command directly in rather than into Notepad first and then pasting, the entire upgrade might have taken less than fifteen minutes. As it turned out, perhaps one of you might be saved some time by this information.
There are some new settings and options in the new vSphere release that I’ll be investigating as I find the time. I’ll be reconnecting the Kill-a-Watt to the server soon to test the new power saving feature, and that data will be included.


Mike, thanks for the post, you probably saved me hours!