XBMC Live 10.0 CPU utilization on Zotac ZBOX HD-ND02

August 8, 2012

I have a Zotac ZBOX, which has been a wonderful little device. The Dual-core Atom within is not the most powerful of processors but the Ion graphics chip more than makes up for the CPU’s shortcomings. XBMC Live 10.0 runs on the machine and really maximizes the machine’s capabilities. A while back I ran some tests to see how much the CPU was being used during various tasks.

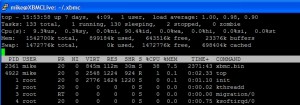
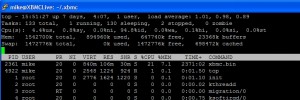
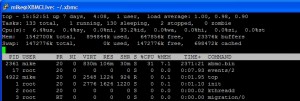
First up is when XBMC is on the main menu. I use the default skin, Confluence.
At main menu

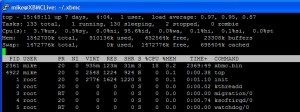
Next is during an album display.
Zotac CPU when displaying list of FLACs

Playing a song took more horsepower as the menu was still up.
Zotac CPU when playing FLAC

Displaying a list of movies.
Zotac CPU when displaying list of videos

Playing a standard definition movie. You will note that this is the least CPU-intensive task of everything tested.
Zotac CPU when playing SD video

You should note the Atom never touched 40% utilization. The Atom/Ion pairing makes for a very efficient combination for a media player.

0


Home Network Backups

July 6, 2012

The past two months I have been working on cleaning up the home network and streamlining my backup processes. Anyone who has accumulated PCs and hard drives over time knows that data creep can overburden your network. I used to split drives into a number of partitions to keep data segregated. Over time some partitions became maxed while others were barely used. Some didn’t even make sense anymore (FAT32 partition anyone?). I don’t follow that strategy anymore (root folders segregate enough for me now) except that my operating system is always(!) on its own partition.

This was a spring cleaning exercise brought on by the slow death of my backup server. The machine was basically eight years old, with four 320GB drives and one 1TB Samsung. It was normally on 24/7 but was powered down prior to our Disney vacation. It didn’t want to come back up. After some work, I resuscitated it so I could be certain of what was on each drive. I ordered replacement parts; a new MB, an AMD X3 455 CPU, and 8GB RAM. The case was fine and the power supply was less than eighteen months old.

Investigating the drives
Hard drives are no longer as cheap as they had been mid-2011 and prior. In addition, since Seagate took over Samsung’s drive manufacturing, there hasn’t been enough data to determine whether that is a good, or bad, thing. As a result of these two factors, I chose to use the drives already I already had on-hand.

Choosing to not expand storage meant I really needed to get a handle on what was stored, and where. During the investigation of the backup machine’s drives, I discovered multiple copies of the same data, on different drives. On paper each drive was listed, along with what was on it (including the spaces being used for each). This gave me a clearer picture of whether there were data on the backup machine that was not really backed up data but rather original information. Fortunately there were only a few instances, primarily family video work from back when the machine was being used as my primary desktop. Everything else was a copy of live data found elsewhere on the network.

Reorganize
Because I did not have a drive large enough to move everything to wholesale, I spent the better part of three weeks shifting data around. In the end, I removed three net drives from the backup server, and am directly protecting more data than before. My entire openfiler SAN, which has continued to grow in importance, is now being backed up via CIFS, rather than backing the vm up. A single script backs it up nightly and, should the need arise, a single script can rebuild the entire SAN from scratch.

What the reorganization did was help identify and eliminate needless redundancy in the backups, and to ensure nothing was being missed that needed backed up. It was silly how much clutter had accumulated across the entire network and this process ended up freeing a large chunk of network space. Once the network was cleaned up to my satisfaction, I turned my attention to what, and how, to better protect everything.

Identify important data and classify
The first thing I did was identify data that was irreplaceable. Family family photos and videos, and scanned items fell into this category. These would be the most highly protected.

The second category were items that could be recreated, but would be extremely time consuming. The FLAC files from my CD archiving project was such an example. I do not ever want to go back through this process, so this data needed protection and a copy stored offsite. The same with the DVDs I have been slowly archiving to the network (and the originals boxed away in the basement) for playing on the XBMC box.

Other data was labeled as being nice to have, and I would prefer not to lose, but not the end of the world if it were lost. Utility installation executables, old DOS games, and notes on various projects over the years are some of my examples.

Backups of the VMware virtual machines were less important. An online backup would be fine in case of vm corruption. Eventually though, once harddrive prices have come down and quality gone back up, the most recent backup of each virtual machine from the NFS datastore would be desirable.

Ghost images of our primary PC are not terribly valuable in the case of fire. I’d have to replace all the physical hardware so the image wouldn’t be useful anyhow. They are saved to the network but are not copied offsite.

Downloads and temporary files obviously fell into the final category that could just be ignored. If they were lost, oh well.

What to protect against
I wanted to protect against accidental deletion, corruption of the primary data, fire/tornado, and theft. Each required a different strategy.

Accidental deletion/corruption is easily implemented. I’ve been using this strategy for years. I have a series of scheduled tasks that backup data nightly. Most run on my primary machine but a couple do run on the backup server itself. Plain old reliable XCOPY and Robocopy handle these tasks. This data is saved to the backup server. I do not sync my backups; it is add or update only. If I delete a file, it will remain on the backup unless I specifically go and delete it.

Theft of hardware is another disaster that needs defended against. TrueCrypt handles all my data encryption needs. It is fantastically secure and uses very few system resources. If a thief decides to steal the PCs, they’ll have a (mostly) bootable machine but nothing else. All data requires the password (quite lengthy bunches of gibberish) to be mounted. All backup drives are likewise protected. This might be considered a bit paranoid but if drives end up in other hands, I like to know they can’t access the bajillion family pictures on them. I also like having everything encrypted for the possibility of a drive failure and needing to send it in under warranty. Fortunately this has never been required but one has to assume it is inevitable.

To protect against fire, I have a two layered approach. The first layer involves periodic backups to external drives that are stored in a fire and waterproof media safe on premises. The safe promises to keep the contents under 155 degrees in a fire, which would be fine for the drives. This step has to be done manually and currently this is about every two weeks, but really needs to be more frequent. I also have copies of the data offsite. I periodically refresh drives that are housed offsite, in addition to burning DVDs of recent data in the interim and sending them offsite, too.

I have considered backing data up to the “cloud” but have ruled it out, at least for most of my data for now. The price is just too prohibitive and the fact that Comcast effectively caps monthly bandwidth to 250GB of data (unless I moved to a business account) means that it would take many months to get my data pushed up. It is far cheaper (and faster) to use DVDs and harddrives stored offsite, and have a fireproof media safe at the house for the more current backups.

These strategies continue to evolve but I thought it might be helpful to others to provide an overview of how I protect my data.
2

Connect to Windows 2008 R2 NFS Datastore from ESXi 4.1

July 4, 2012

Background
I had been successfully backing up to a NFS Datastore on my backup server running XP for the past year. Hardware issues began to crop up on the server (which was a hodgepodge of parts, most of which were at least seven years old) which necessitated a rebuild. A new motherboard, CPU and 8GB of Ram were swapped in. The case and power supply were newer and perfectly fine. The older 300GB drives were taken offline and two drives (1TB and 2TB) were repurposed from elsewhere in the network.

I installed Windows 2008 R2 on the machine. This is where I knew my existing NFS connection directions would need to be adjusted. This is because Microsoft decided to remove User Name Mapping from this server version. It took me a number of tries and missteps to get the share connected properly so I hope this abbreviated post helps save someone time.

What I did
Step one was to follow this post’s directions. It is excellent but I still could not get the NFS datastore to mount through vSphere. I then went back and made sure Everyone was granted full permissions on all tabs on the 2008 share. Apparently I missed one as suddenly I could mount the share, except it showed as zero space. Hmmm.

After some googling, I found this post. There was one item that solved my problem immediately.
Change Security Policies on 2008 R2

“Go into your local security policy, and make sure under Security Settings -> Local Polcicies -> Security Options, that you have ‘Network access: Let Everyone permissions apply to anonymous users’ set to Enabled. Reboot your server, and try again.”

Now I saw the NFS share and could browse it.
NFS Datastore now showing

I ran a ghettoVCB script to backup a virtual machine as a test. It began to run properly and completed in a reasonable time period. Excellent. Hope this helps someone.

0

AoE (ATA over Ethernet) benchmarks on my home network

June 15, 2011

This week I stumbled upon a technology that was new to me: AoE, or ATA over Ethernet. This protocol was being hyped as a faster, much cheaper alternative to iSCSCI and NFS. In a nutshell, AoE “is a network protocol, designed for simple, high-performance access of SATA devices over Ethernet”.   I found a short description of a typical setup on Martin Glassborow’s site that demonstrated how quickly AoE could be set up.  This sounded very interesting to me and worth investigating further. I was curious to see whether it would be anywhere near local-storage speeds in my set-up.

I hit the Ubuntu documentation for how AoE was set up on a Ubuntu 10.04 virtual machine. I created a small, 10GB test disk with vSphere and attached it to my Ubuntu 10.04 vm. After a reboot, I started up the Disk Utility (System/Administration/Disk Utility),formatted the volume, and then mounted it. I noted the drive letter (sdb), as you will need it in steps 4 and 5. After that I performed the following steps in a command window:

  1. sudo apt-get install vblade
  2. sudo ip link set eth0 up
  3. I then tested to make sure it was working:
    sudo dd if=/dev/zero of=vblade0 coast=1 be=1M
    sudo vblade 1 1 eth0 vblade0
  4. I exported the storage out:  sudo vbladed 0 1 eth0 /dev/sdb
  5. I also edited rc.local to add the above line to startup: sudo nano /etc/rc.local

Next, I began setting up the client side (Windows XP machine).  I downloaded the Starwind Windows AoE Initiator, which required me to register first.  This application was installed on the Windows box, and started up.  I added a new device, chose the adapter, and selected the drive that was listed.  The drive suddenly was recognized by Windows as new and connected.  Very cool.

New AoE Disk

In XP’s Computer Management, I initialized the new drive and formatted as NTFS.  It took but a few seconds for the 10GB drive to complete.  Everything about this AoE-connected drive made it appear as if it was directly connected to my machine.  The whole process I’ve described to this point took a bit less than twenty minutes, not counting the few minutes to register at Starwind.  Now I wanted to see if it was as fast as local storage.

New, formatted AoE disk

Testing
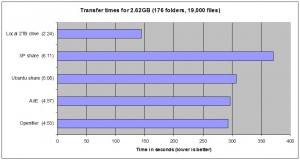
I chose a local folder that was 2.62GB in size, with 176 folders within it containing 19,000 files.  This was small enough to not take all night for the tests, but also had enough small files within to make it more challenging that simply a single, large file.  I popped up the system clock (with a second hand), and noted the start time when I pasted the file, and stopped the clock when the transfer completed. I did nothing else on my machine while the tests ran.  The results are below.

Transfer times for folder

Conclusions
While these results are not overly scientific and very specific to my environment, they do give some valuable comparisons.  In my environment, AoE performed no better than an Openfiler or a common Ubuntu (samba) share. It certainly was much slower than local storage but honestly, what isn’t? If AoE had been noticeably faster than OpenFiler, I might have considered finding a use for it. As it stands, it was no faster than any other share on the ESXi box. It did take precious little time and effort to set up and test, so I consider it time well spent. In a large environment, perhaps on a SAN, the results might be different.

3

Backing up XBMC Live 10.0 configuration to network CIFS share

March 1, 2011
Tags: ,

The last several posts have described my foray into HTPC territory. My XBMC Live installation is humming along nicely on the Zotac ZBOX HD-ND02, and we are thoroughly enjoying it. Although the installation of XBMC Live was quick and painless, I have made quite a few changes to the skin settings, media paths, SSD settings, and have lot of data loaded into the databases. Getting this all set back up from scratch would take some effort (if I could even remember what was changed) in the event a complete re-installation was needed. Consequently, a scheduled backup of the important data was needed.

What to Back up?
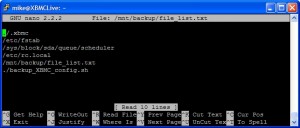
First, though, I needed to figure out exactly what was important to copy off. Obviously the .XBMC folder needed backed up in its entirety as that contained all the XBMC-specific files. In addition, any other system file that was modified needed backed up. I’m not sure what system files were changed automatically, but the following files were changed by me:

/etc/fstab
/etc/rc.local
/sys/block/sda/queue/scheduler

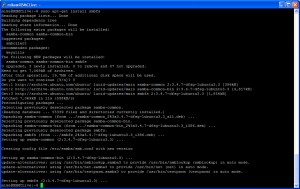
The first thing I needed to do was install SMBFS on XBMC. At a command prompt type: sudo apt-get install smbfs. Respond ‘Y’es to the question, and let it run. It’ll take just a minute or two to complete.

install smbfs on XBMC

Network drive to backup to
The data would be backed up to a share named XBMC_Backups on my OpenFiler virtual machine. To be able to mount this drive during the backup process (we only want to mount the share for the duration of the script, to minimize needless network traffic), I needed to create an entry in fstab in addition to creating a mount point.

mkdir /mnt/backup
sudo nano /etc/fstab

fstab entry

The entry has noauto so the share is not mounted at boot. I also used OpenFiler’s static IP address, instead of its name, to minimize potential problems for me.

We’ll want to backup a list of folders and individual files, so I created a text file named file_list.txt in /mnt/backup. This will make it easier for me to add files in the future if other important ones are uncovered. Plus it makes the script a little less confusing.

File_list.txt

Test the commands manually
I tested the commands via the command line before adding them to the script. I first mounted the backup share:

mount /mnt/backup.

Then I ran the tar command:

tar zvc -T /mnt/backup/file_list.txt --file /mnt/backup/xbmc-`date +\%Y\%m\%d_\%H\%M\%S`.tar.gz

This took a minute or so to churn through all the files, but in the end, a shiny new tar.gz archive showed up on the network.

Archive viewed from Windows

The script
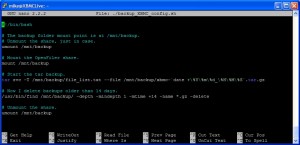
The script itself is straightforward. I named it ./backup_XBMC_config.sh.

# The backup folder mountpoint is at /mnt/backup.
# Unmount it to ensure it is not already mounted.
umount /mnt/backup 

# Mount the OpenFiler share.
mount /mnt/backup

# Start the tar backup using gzip compression.
tar zvc -T /mnt/backup/file_list.txt --file /mnt/backup/xbmc-`date +\%Y\%m\%d_\%H\%M\%S`.tar.gz 

# Now I delete backups older than 14 days.
/usr/bin/find /mnt/backup/ -depth -mindepth 1 -mtime +14 -name *.gz -delete

# Unmount the share.
umount /mnt/backup

backup_XBMC_config.sh

I then gave everyone the ability to execute the file.

sudo chmod 777 ./backup_XBMC_config.sh

I manually tested the job out.

sudo ./backup_XBMC_config.sh

Next I needed to add this job to the crontab.

sudo crontab -e

The job will run at 3am on M, W, Sat so I added the following line to the crontab file:

0 3 * * 1,3,6 ./backup_XBMC_config.sh

crontab

And that is it. The job runs three times a week, sending a gzipped file to the OpenFiler backup folder. It also deletes any file older than 14 days with a .gz extension.

1

Tuning a Solid State Drive (SSD) on XBMC Live 10.0 HTPC

February 28, 2011
Tags: ,

I have a Kingston SSDNow S100 SS100S2/16G 2.5″ 16GB SATA II Internal Solid State Drive (SSD) in my home theater PC. Although this was my first actual taste of a SSD, I understood that TRIM must be enabled on the drive to keep it performing smoothly for the long haul. Otherwise it would gradually decline in performance, and that would not be good.

In this post I will describe what changes were made to my XBMC Live installation. There are countless sites that describe how to enable TRIM, but I found one especially helpful. This site was cptl.org. Much of this post was based upon information on those pages but specifically directed at the XBMC Live 10.0 standard installation.

PuTTY
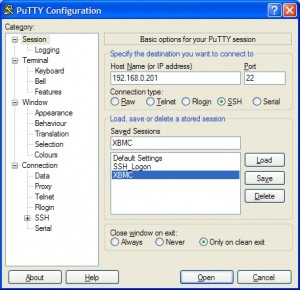
You need to get to the command line to make these changes. For me, it was easiest to just SSH into the machine. For this, I use PuTTY.

PuTTY configuration

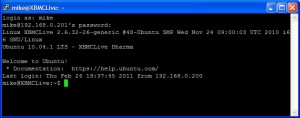
PuTTY XBMC initial screen

Once you enter your user id and password, you are at the command line and can do the serious work.

Enabling TRIM Support
There were two options that needed to be added to the SSD’s mount information found in /etc/fstab, “discard” and “noatime”. What the “discard” option does is tell Linux that you wish to enable TRIM support. “Noatime” prevents Linux from updating the last-access time for files and directories, which saves a ton of writes.

sudo nano /etc/fstab

Add "noatime,discard" to the /dev/sda1 entry, then save and exit the file.

fstab showing noatime and discard

Next, you can remount the SSD.

mount -oremount /dev/sda1

Swappiness and noop disk scheduler
The swap file is not really needed on my system. XBMC uses only a small percentage of the available RAM, and I don’t plan to use hibernate due as 1) the machine boots in less than 20 seconds, and 2) it is on 24/7. To keep Linux from swapping to disk except in the most extreme circumstance, I changed the “swappiness” setting to 1 (0-100 is the range) from the default of 60.

There are a variety of disk schedulers Linux can use. I am using a solid-state device, where all seeks take exactly the same time. Consequently, using a scheduler that reorders I/O requests to group by location on the physical drive does not make sense. I changed the default scheduler, cfq, to be “noop”. Noop disk scheduler simply inserts all requests in FIFO order.

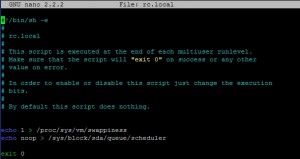
sudo nano /etc/rc.local

Add the lines:

echo 1 > /proc/sys/vm/swappiness
echo noop > /sys/block/sda/queue/scheduler

Save and exit the file. This file will get executed each time the machine reboots.

rclocal with swappiness and noop

These few tweaks should ensure my solid state drive stays fast for many years.

4