OpenFiler within ESXi
Introduction
My home network has an ESXi machine I built earlier this year. Dealing with a SAN at the office made me want to enjoy some of the same luxuries at home as well. OpenFiler is a free, open source SAN Server, and is quite well thought of, so I thought it would be worth a look. Many people use it on a dedicated PC, generally an older model. Having the VMware machine allowed me to set it up as a virtual appliance, a tactic an equal number of people employed.
Grabbing the OpenFiler Appliance
I downloaded the 64 bit VMWare Virtual Appliance version, extracted the files from the tar.gz archive, and uploaded it to a newly created OpenFiler folder on the esxi box. I added the .vmx file to the inventory, and checked the settings. I kept them as default to begin with, then started the appliance.
You can open the console to see what Openfiler is doing but it shows very little information. The actual method of administering OF is through a web browser. Go to https://192.168.0.100:446, and log on. There you can make the changes you need.
Setting it up
First off, I decided not to use iSCSCi but rather SMB/CIFS. I do not have an active directory so access would be allowed through ip addresses within the local network.
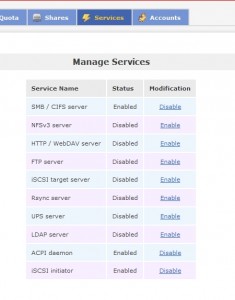
- 1. Navigate to: Services > Manage Services, and click Enable on SMB / CIFS server.
2. Navigate to: Services > SMB / CIFS Setup.
3. Fill in the NetBIOS name (ie. OpenFiler). This is how the server is accessed (ie. \\OpenFiler\myshare). I kept it OpenFiler to more easily identify it. You can leave all other settings as they are.
Adding initial test Storage
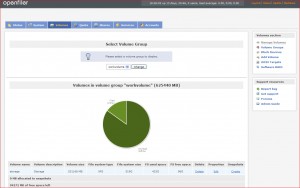
The OpenFiler appliance does not include any storage. To test it, a small secondary drive was needed. I powered down OF, allocated a 40gig drive through ESXi, connected it to the virtual machine, and then powered up OF. Nothing showed differently in OF. I still needed to create a volume group using this storage. I created the volume group name, and selected the 40gb physical volume to add to it. Then I created a new volume with this volume name.
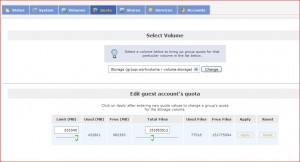
I set quotas for guest, allowing them most of the drive. You could easily set up multiple groups, each with their own quotas. Finally, I powered the appliance back up.
Network Configuration
In order for machines on the network to see and use the appliance, network access needs defined.
- 1. Navigate to Network Configuration. The Hostname and Primary DNS should already be filled in for you.
2. Scroll down to Network Access Configuration. This is how I defined my network. For each machine I wanted to have specific settings for, I created a new configuration for. Simply enter the name of the machine , the IP address and netmask. In setup, I also defined the router itself, and the local network. Each were defined as Share. Click Update.
Now we needed to make shares.
- 1. Navigate to: Shares.
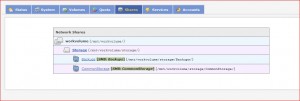
2. Click on Storage, fill in the sub folder name in the popup (I first chose “Backups”), and click Create Sub-folder.
3. Click on the just created sub folder, and click Make Share.
4. Under Edit share fill in the same share name (to name it “[share name]”).
5. Scroll down to Share Access Control Mode and set it to Public Guest access (if not, set it and press Update). You could use Controlled access but in my home environment that wasn’t really needed.
6. Scroll down to Host access configuration.
7. Select RW under SMB/CIFS (Read/Write access for the the IP-range for our shares.)
8. Click on Update.
Repeat this for the CommonStorage share.
Testing it
To test the appliance, I entered ‘\\OpenFiler\’ at START/RUN. This popped up an Explorer Window with the two shares showing, CommunityStorage and Backups. I mapped S:\ to \\OpenFiler\CommunityStorage and T:\ to \\OpenFiler\Backups. I played around with this sparse setup for a few days, testing its response and acclimating myself to the OpenFiler administration panels. After this time, I decided that 40gig was not going to be sufficient for any real purpose.
More Storage Needed
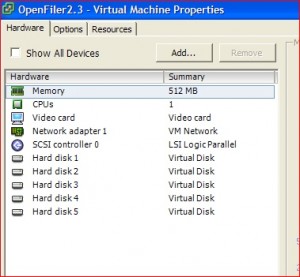
My intention was to begin using it as a network backup device. I wouldn’t backup everything, just photos, videos from three years ago forward, and documents. There was ample space remaining on the second ESXi physical drive so I created three 256gig drives. (Note- 256gig was the largest virtual drive I could create on my server due to my formatting that physical drive as 4k blocks.) I powered down OF, attached the three drives to the virtual machine, then turned it back on. You can see all five drives below. Hard Disk 1 is the appliance partition, 2 is the 40 g, and 3-5 are the 256gig drives.
Once OpenFiler booted up, it was a simple matter of editing the volume group and adding these new physical volumes. Now we had some real space to work with. I went to each PC on the network and mapped S:\ to \\OpenFiler\CommunityStorage and T:\ to \\OpenFiler\Backups. This took about a minute per machine and now gives a common location for shared data and backups.
Batch Backup Jobs
Once everything was set up on OF, I went about updating my nightly batch jobs (essentially .bat files with XCOPY commands set up to run as scheduled tasks in the middle of the night) to copy files to T:\ as well as to the current backup server. After that, another new script was created that would be run only in the event the entire OF drives needed repopulated. All the folders are created in that script. The first line of the batch job was made ‘EXIT’ so the job couldn’t be run by accident; I would have to comment it out, save, and then run the job.
On the ESXi machine, OpenFiler was set to start up first when ESXi booted up. This way, if the network needed brought back online (think extended power outage), the machines would see S:\ and T:\ quickly. This was added after we did have our first, two-hour outage.
Experiences
Having two backup machines in parallel use makes direct comparisons easier. For infrequent accesses, the OF appliance was the winner for a couple reasons. One, the ESXi drives never spin down, while the backup machine’s are set to stop after 15 minutes of inactivity. But even beyond that, the new server is just that much more advanced, and the two drives are much faster than the much older, 300g drives. The power usage of the ESXi box is also lower, and the machine is quieter, for what that is worth. (I’ll be describing my ESXi setup in a future post).
OpenFiler also has much more flexibility than the drives in the backup machine. I cannot span physical drives in the older machine, while adding additional, virtual drives that could be on any physical volume in the ESXi is simple.
On the other side, I have no experience with repairing OpenFiler (on ESXi no less) if it starts causing problems. I know that if the current backup machine fails, I can always yank the drives and slave them into any other machine and still read the NTFS-formatted data from them. There is a comfort level associated with that ability. However, right now OF is truly a backup device only. If it were to fail and need rebuilt, all the data exists elsewhere on the network. It would be a simple matter of setting OF back up (using the design from this post), and running the new batch script to push the data back to the appliance. If this situation does arise, I will be sure to write about it.
In short, I can easily recommend OpenFiler to anyone looking for a powerful, free backup OS.
Leave a Reply