ESXi Windows NFS datastore inactive upon reboot

September 6, 2010

The problem
The NFS datastore I recently created to hold the virtual machine backups from my home ESXi server showed as “inactive” upon a recent server reboot. This was unexpected but, after some Googling, definitely not unusual. A second reboot (why not?) still did not restore the connection. I needed to find a proper solution to this problem.

My solution
Research pointed me toward the Advanced Software settings in VSphere. Under NFS I changed the following three settings:

HeartbeatFrequency: 12
HeartbeatTimeout: 20
HeartbeatMaxFailures: 10

NFS Advanced Settings

I based these values on EMC and NetApp recommendations, except I went crazy with the NFS.HeartbeatTimeout; they only recommend 5. I went with a larger value as my NFS share is much slower than these vendor’s fine products.

These values work as such (cribbed from this post):

  • Every “NFS.HeartbeatFrequency” (or 12 seconds) the ESXi server checks to see that the NFS datastore is reachable.
  • Those heartbeats expire after “NFS.HeartbeatTimeout” (or 20 seconds), after which another heartbeat is sent.
  • If “NFS.HeartbeatMaxFailures” (or 10) heartbeats fail in a row, the datastore is marked as unavailable (“inactive”).

It appeared that ESXi stopped trying to connect to the NSF share before the physical connection was even available. By upping the low defaults, this appears to have corrected the issue. Four reboots and the datastore is still available.

2


Compressing Windows NFS share to simulate ESXi thin provisioning

September 5, 2010
Tags: , ,

The problem
In an effort to automate backups of some of my VMWare ESXi virtual machines, I configured a Windows Services for Unix (WSFU) share as a datastore, and set up GhettoVCB to backup the machines to the share. The problem that I discovered with this approach is that WSFU does not retain the “thin” provisioning the virtual machines were built with. My example vm was a 40GB installation of Ubuntu 10.04 (highly recommended).

A solution
A solution that I arrived at was to simply enable Windows compression on the share itself. This is accomplished simply by right-clicking on the shared folder, click Advanced, check Compress contents to save disk space, then OK.

The only downside I could see with this approach (besides it being a bit kludgy) was that the backup would take longer. This would not be a big deal to me as the backups occur in the dead of night and would be complete long before I would be on the machines. The plus would be it should take up space very equivalent to that on the VMFS datastore, if not less.

The rest of the post details my observations working with the Ubuntu virtual machine.

The before numbers
The virtual machine uses 13.5GB of the provisioned 40GB. The backup took 27 minutes to complete before compression. The CPU utilization on the Windows machine hovered around 40% (this is an older, single-core).

After enabling compression
The CPU utilization was much higher during the backup with compression on. It ranged between 73 and 95%.

CPU utilization on compressed backup

Surprising to me, the new job didn’t take much longer at all. The backup ran for 28.72 minutes, less than two minutes longer than the previous job, and resulted in a file size of just 8.25GB. Not a bad trade-off at all.

Compressed folder after backup

What I did find was strange, though, was the filesizes of two folders I had created prior to compressing. When I flipped the compression setting to on, Windows did its thing on the existing data. The folders compressed down to 7.33GB. The vmdk was exactly the same. A higher level of compression must be possible on closed files than on data being compressed on the fly. It is not a problem for me at all, it just seemed an interesting tidbit.

Compressed folder with two backups

In summary, if you are using a WSFU storage device for your backups, turning folder compression on is definitely worth your effort.

11

Using ghettoVCB.sh to backup ESXi 4.1 VMs to NFS Datastore

August 27, 2010
Tags: , ,

Introduction
I recently created an NFS datastore on ESXi, linked to a Windows Services for Unix (WSFU) share on my backup, Windows XP machine. The purpose of the datastore was to store virtual machine backups. The next step in the process is to configure ghettoVCB to perform the VM backups.

ghettoVCB
Details of ghettoVCB can be found on the VMware site. Download the zip file from that page.

In VSphere, browse datastore1.  Upload the zip file to that datastore (through VSphere client), connect to the Tech Support mode via PuTTY, and extract the contents of the tarball. The process is as follows:

  1. Start up Veeam Backup and FastSCP, then select Tools -> PuTTY.
  2. Log on with the user and password.
  3. Type ‘cd vmfs‘.
  4. Type ‘cd volumes‘.
  5. Type ‘cd datastore1‘.
  6. Type ‘tar -zxvf ghettoVCB.tar.gz‘.
  7. Type ‘cd ghettoVCB‘.

I created a list of virtual machines to backup.  The list was just one VM to begin with, Ubuntu 10.04. I called the list ‘myvmdk.vmdk’.

  1. Type ‘vi myvmdk.vmdk‘.
  2. Type each virtual machine name, one per line, that you will want backed up.
  3. When complete, hit Escape, then type ‘:WQ’ to save the new file.
  4. Type ‘chmod 777 ghettoVCB.sh‘ to set the permissions.

You’ll need to edit the ghettoVCB.sh file for your individual installation.  Most of the lines you can leave the as-is but there are a few near the top that will need changed.  They are fairly self-explanatory.  You’ll be able to see my configuration settings in the screen shot in the next section.

Run the backup manually
I then tested my setup by typing ‘./ghettoVCB.sh -f myvmdk.vmdk -d debug‘.  Depending upon how large your virtual machine is, the job could take a little while to run.  Fortunately the progress is shown at the bottom of the screen.  Once the job has completed, it will look like the following screen shot.

ghettoVCB backup

Automating the backup job
You’ll need Plink.exe on the Windows machine. You can get it from here. I downloaded it, and moved it to C:\.

Now you can create a simple batch (.BAT) file with your backup command in it, that can be scheduled via the Windows scheduler.  Open Notepad.  Type ‘C:\plink.exe root@<ip_address_of_ESXi_host> -pw <password> "/vmfs/volumes/datastore1/ghettoVCB/ghettoVCB.sh -f /vmfs/volumes/datastore1/ghettoVCB/myvmdk.vmdk -d debug“‘, replacing <…> with your information.  Save the file on the Windows machine with a .BAT suffix.

Before you schedule the task, you’ll need to take care of a housekeeping issue.  Highlight the command and paste it into a command window on the Windows box.  You will likely receive a message the first time saying the server’s host key is not cached in the registry.  Go ahead and answer ‘y’es to storing the key in the cache.

Now you can set the task to run as a scheduled task in Windows, just as you would any other task.  I set mine to run once a week in the middle of the night.

I noticed that, despite me setting the parameter for the backup to be thin provisioned, the backups were still full-size.  This will get researched in the near future but right now this serves my immediate need.

8

Setting up an NFS share to receive ESXi 4.1 VM Backups

August 22, 2010
Tags: ,

Introduction
All the datastores on my ESXi box are local currently. In order for me to effectively back up virtual machines, an external datastore was needed. I chose to use Network File System (NFS).

None of my virtual machines are mission critical but I do have several that would require some effort to reinstall and get back to where they were. I could manually backup the vms as necessary but realize that automated tasks have a far greater chance of getting done than relying on memory or manual tasks. Automation has served me well in the past. This document covers how to set up an NFS share on a Windows machine, and how to create a datastore on ESXi linked to it.

Obtaining the group and password files
Setting up NFS requires the group and passwd files from the ESXi server to be located on the NFS Windows machine. This requires a connection to the Tech Support Mode command line interface.

Start up Veeam Backup and FastSCP, then select Tools -> PuTTY.

Log on with the user and password. I chose to copy the files to the ISO folder on datastore1 to make it easy to move elsewhere.

    1. Type ‘cd /etc‘.
    2. Type ‘cp passwd /vmfs/wolumes/datastore1/ISOs‘.
    3. Type ‘cp group /vmfs/wolumes/datastore1/ISOs‘.

PuTTY

I then copied these files to my Windows machine, named DUALBOOTXP (right-click -> Copy in Veeam’s Explorer windows).

Installing Windows Services for UNIX (WSFU)
I downloaded Windows Services for Unix 3.5. NFS was to be set up on my backup machine, an older single-core machine with four hard drives. There was plenty of available space on a 1TB drive, so a folder was created on it named ESXi-Backups. I installed both the NFS client and NFS server on the designated machine (DUALBOOTXP). The locations of the passwd and group files from above are needed during the installation.

User mapping for NFS

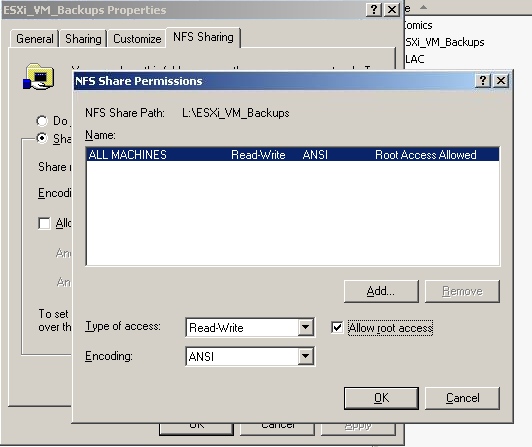
When installation is complete, you can right-click on the folder, select Properties, and you’ll see a new tab (NFS Sharing) is now available. Click on that tab and share the folder off. I named it ESXi-Backups.

Sharing the NFS folder

Select Permissions. Change type of access to “Read+Write”, and select to allow root access.


NFS permissions

Now go into UNIX Administration by START -> Programs -> Windows Services for UNIX. Select User Name Mapping.

Services for UNIX Administration

Click on Maps. Click on List Windows Users and List UNIX users. Highlight Administrator from the Windows side, and root from the UNIX side. Click Add. Click OK to each question. Then click Apply.

Apply user maps

Open Port 2049 in your Windows Firewall [IMPORTANT ITEM #1!]
Not doing this wasted a good thirty minutes.  NFS datastore creation always failed until I disabled the firewall.  Suddenly it worked.  A quick Google search showed that you need to open port 2049 for NFS servers. I reenabled the firewall, opened the port, added the datastore and everything worked fine. But I get ahead of myself.

Create an NFS Storage VMKernel Port in vSphere [IMPORTANT ITEM #2!]
You will need to create a new VMKernel port.  This was the first gotcha for me.  It took me at least two hours over the course of several days to figure out these steps.  I hope this saves you some time.

    1. Go to Configuration -> Networking -> Add Networking. Select VMkernel as the connection type.

    Add VMkernel

    2. Create a virtual switch.

    create a virtual switch

    3. Name the label NFS Storage.

    NFS label

    4. Give the port a valid, unused, IP address within your domain.

    NFS address

    5. The new VMkernel port will now show for you. You still have one more task to get it to work properly.

Go back into PuTTY, and log on to the Tech Support Mode.

    1. Type ‘esxcfg-vswitch -A VMkernel vSwitch2‘. vSwitch2 is the switch that was just created.
    2. Type ‘esxcfg-vmknic -a -i 192.168.0.208 -n 255.255.255.0 VMkernel‘. 192.168.0.208 is the IP used in the previous step.
    3. Type ‘esxcfg-route 192.168.0.1‘. This is your network gateway.

Now you are ready to add the datastore.

Configuring ESXi to mount the NFS share as datastore
Next up was configuring the VMWare server to see the NFS share as a new datastore.

    1. Open vSphere client.
    2. Select the Configuration tab, then Storage.
    3. Add Storage.
    4. Select Network File System.
    5. Enter the server name (or IP address- I used the IP address), the folder name you shared off, and the new datastore name.
    6. Click Next, then OK.


NFS Datastore

That is it for installing and setting up the NFS server and shared folder. My next post will describe setting up ghettoVCB.sh for automated virtual machine backups.

14

Enable Tech Support Mode on ESXi 4.1

August 19, 2010
Tags: , ,

Tech Support Mode
Back when I first installed VMware’s ESXi on my machine, the method for enabling SSH on it required you to have physical access to the machine so you could view/interact with the console. You had to see the output from the ESXi Server. There were six steps. After I upgraded to ESXi 4.1, I discovered that SSH was disabled again. Fearing the worst, I consulted my friend Google. It appears that VMWare decided to make the process much less painful.

Enabling Remote Tech Support (SSH) on 4.1
Go to your vSphere client’s Configuration Tab.
Click on Security Profile, then Properties.  The screen will look as below.

vSphere Security Profile

Highlight Remote Tech Support (SSH), then click Options.

vSphere Remote Tech (SSH)

Click Start. Check Start Automatically, click OK and you’re done. The service, and SSH, is now active. Very slick!

0

Upgrading from ESXi 4.0 to 4.1

August 12, 2010
Tags: ,

Introduction
In July VMware released a new version of vSphere client and ESXi. I finally got around to seeing what is new in 4.1. Many of the new or enhanced features either did not impact me, or required vCenter (read: $$$$). However, there were some excellent features that did catch my eye:

  • Performance and Scalability Improvements. New optimizations have been implemented for AMD-V and Intel VT-x architectures, while memory utilization efficiency has been improved still further using Memory Compression. Storage enhancements have led to significant performance improvements in NFS environments. VDI operations, virtual machine provisioning and power operations, and vMotion have enhanced performance as well.
  • Reduced Overhead Memory. vSphere 4.1 reduces the amount of overhead memory required, especially when running large virtual machines on systems with CPUs that provide hardware MMU support (AMD RVI or Intel EPT).
  • Memory Compression. Compressed memory is a new level of the memory hierarchy, between RAM and disk. Slower than memory, but much faster than disk, compressed memory improves the performance of virtual machines when memory is under contention, because less virtual memory is swapped to disk.
  • Configuring USB Device Passthrough from an ESX/ESXi Host to a Virtual Machine. You can configure a virtual machine to use USB devices that are connected to an ESX/ESXi host where the virtual machine is running. The connection is maintained even if you migrate the virtual machine using vMotion.
  • vCLI Enhancements. vCLI adds options for SCSI, VAAI, network, and virtual machine control, including the ability to terminate an unresponsive virtual machine. In addition, vSphere 4.1 provides controls that allow you to log vCLI activity.

This short list of improvements was enough to decide to do the upgrade to the ESXi installation and the vSphere client running on my Windows box.  The remainder of this post explains exactly how I performed the upgrade.

Preparing for the Upgrade
The first thing I did was pull down the PDF document vSphere Upgrade Guide, and printed it out. I read through the applicable portions of the document to get an understanding of what the upgrade entailed.

Per the guide, I backed up my ESXi settings using ESXi Configurator.  I  connected to the host, and then backed up the configuration to my Windows machine.  While I was backing things up, I went ahead and backed up (again, to the Windows machine) the smaller-sized VMs.  OpenFiler’s boot drive was already backed up, so I was covered there.

One of the new features was decreased memory overhead. I wanted to have the ability to have before-and-after statistics, to see just how much my installation was impacted by the upgrade. I stopped all the machines that were running, then restarted them to eliminate any possible virtual machine memory leaks. Then I printed several applicable vSphere screens for the before conversion, base-line numbers. I plan to detail my observations on the improvements in a future post.

Visit the ESXi 4.1 Downloads page.  Be sure to log onto the VMWare site before going to the download page.  If I didn’t do that, I would receive the error “Sorry, at the moment you are not authorized to download VMware ESXi 4.1 Installable”.  Download ESXi 4.1 (Upgrade ZIP from 4.0 to 4.1), VMWare vSphere Client 4.1, and VMWare Tools for Linux clients.  I renamed the upgrade zip to ESXi41_upgrade.zip to save me typing later on.

VMWare 4.1 download page

Upgrade ESXi to 4.1
The following are the steps that I followed. They are modeled after the instructions here.

  1. Power off all the VMs.
  2. Place the ESXi host in Maintenance Mode.  Do this from the vSphere client.  Right-click on the server host in the Inventory, and select Enter Maintenance Mode.
  3. Launch the vSphere CLI by navigating to Start –> All Programs –> VMware –> VMware vSphere CLI –> Command Prompt.
  4. Type  cd bin.
  5. Enter the following syntax : vihostupdate.pl -url https://ipaddressofesxiserver/sdk/webservice -i –bundle pathtodownloadedzipfile.  In my case, the string was “vihostupdate.pl -url https://192.168.0.210/sdk/webservice -i -bundle f:\ESXi41_upgrade.zip“.
    NOTE: I discovered you cannot cut and paste this command into the CLI DOS prompt. You must type it in. I spent an hour scratching my head until I came across this post. It was a lifesaver!
  6. Provide the administrative account username and password when prompted.
  7. After the install completes (it took about five minutes for me), reboot your ESXi Host.
  8. After your host comes back up exit Maintenance Mode.

Now that you have now updated your ESXi host from 4.0 to 4.1 you should update your vSphere Client, CLI versions and VMTools to 4.1 as well.

Upgrade vSphere
Simply run the installer.  It will only take a few minutes. Then fire it up for the next step of upgrading the tools.

Upgrade VMTools
ESXi 4.1 also came with a new vmtools installation, which I applied to each of my virtual machines.  I applied it automatically to the Windows clients. I uploaded the vmware-tool-linux ISO to the datastore, and connected it to each Linux VM in turn, then powered them on.  I followed the instructions on the VMWare site.

Conclusion
That was all that was needed to upgrade ESXi to 4.1.  If I had initially typed the CLI vihostupdate command directly in rather than into Notepad first and then pasting, the entire upgrade might have taken less than fifteen minutes.  As it turned out, perhaps one of you might be saved some time by this information.

There are some new settings and options in the new vSphere release that I’ll be investigating as I find the time.  I’ll be reconnecting the Kill-a-Watt to the server soon to test the new power saving feature, and that data will be included.

1