XBMC Live 10.0 on a Zotac ZBOX HD-ND02 linked to OpenFiler VM media library
Introduction
During the previous post I described my CD-to-FLAC project. The purpose of that project is two-fold: 1) create a digital, loss-less backup of all our existing CD collection, and 2) be able to access this mountain of media and play it on our main stereo system. I was already looking to possibly replace my aging Harmon Kardon AVR20 (a great little product that has served me well for sixteen years), so a receiver with media-serving capabilities would be a plus.
What I discovered was that the media capabilities of the receivers (at least in the sub-$1k range) left a lot to be desired. The Onkyo I initially gravitated toward had a text-only interface, and would have required way too much scrolling through lists. I dropped down one notch in the product line, eventually deciding on the Onkyo SR-608. This model offered 1080p video-switching, a ton of inputs, and quality sound/video. The difference in costs of the two models would be used to pay for a proper media-serving option.
There are many plug-and-play options out there for serving and/or playing your media: Squeezebox, Popcorn Hour, and Boxee, to name just a few. Although these were popular choices, I quickly decided that a “more flexible” alternative was necessary. By flexible, I meant “build it yourself”.
The Atom processors had spawned Netbooks, and were now being used in “nettops“. There were now small nettop boxes that were being used in home theater applications. I just needed to find one that met my needs. A buddy pointed me to XBMC for the frontend. There is even a live version of XBMC which wraps a Linux-blanket around the app, and makes it a standalone OS product. The XBMC forums often recommended the Zotac ION products. After additional research, the ION/XBMC path seemed the best solution for my situation. Small, very low power, able to play high definition content without problems, and a wealth of threads discussing it. It certainly sounded like a winner.
Hardware
After a little more research, I decided on the Zotac ZBOX HD-ND02. It came without harddrive or RAM. The Muskin 2GB stick of RAM looked nice, and the forums liked pairing solid state devices (SSDs) with the Zotac/XBMC combination. According to them, it made moving through large lists much, much quicker than from a standard, spinning harddrive. This made sense, so I grabbed a 16GB SSD, too (it was a Newegg combo with the Zotac). The 16GB would be plenty as all the media would actually be located elsewhere on the network. Finally, this PC would be headless and not visible, so I’d need a remote to control it. The MCE remotes work with XBMC right out of the box, so I chose the AVS Gear GP-IR01BK.
Next up, I needed to get the XBMC Live onto a bootable USB thumbdrive. The Zotac does not have an internal CD and I’d need a way to install the OS.
XBMC Live
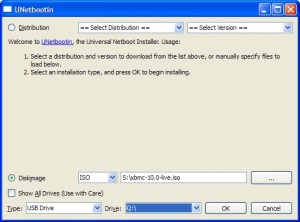
I downloaded XBMC Live 10.0 “Dharma” ISO from the XBMC site. To create the bootable USB, I turned to UNetbootin. This handy little utility can run on my XP machine, and will take an ISO image and quickly generate a bootable USB thumbdrive. I just inserted a spare USB drive, and pointed the application to it and the ISO location. Click OK, and let it perform its magic. When it is complete, don’t click Reboot Now.
The Zotac
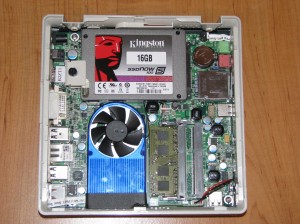
Setting up the Zotac was a breeze. I installed the RAM, the SSD, and that was it. The interior of the Zotac was nice and compact, but easy to work in.
I connected the all the cables. Once it was powered on, pressing Del took me to the BIOS. Several settings needed changed and, of course, I wrote none done. Memory serves that ACHI was enabled, hardware graphics was set, and set the initial boot device to USB. 512MB (from the default 256) of memory was assigned to video.
I saved all the BIOS changes, plugged the USB drive in, and rebooted the machine.
Install XBMC Live
The machine quickly posted and the menu came up. I selected to install it to the HD. I kept all the default settings throughout the install, and selected an appropriate username and password. Once done, I removed the USB drive and rebooted. This process was exceedingly simple.
Configuration
You can configure (almost) everything in this release of XBMC from the graphical interface. I understand that previous releases required some tinkering “under the hood”, so it was fortunate I picked this release to work with.
Everything can be tweaked. I stuck with the basics in mine: zipcode for the weather, and adding media sources. Music was one path, movies was a combination of two (MKV one, and .avi storage for the other), and TV shows was another. This would work for me begin with.
Once I was satisfied all the shares were mapped, I powered down the device, unhooked everything, and took it to its final resting place, the main living area.
Testing it all out
The first thing that I noticed was that the screen was missing some vital information. The screen resolution was set at 1280×720 (my TV is 720p) but not all the user interface was visible (in fact, much was off the screen). It took me a few minutes to find the video calibration tool. It is at System -> Settings -> System -> Video Output -> Video Calibration. Be sure to step through all the screens. This fixed my issue.
My initial reaction was how peppy everything was. Moving from screen to screen was as quick as it should have been. Quite nice. Once I went to test a CD, it became apparent there was no audio. A quick Google search showed this is a common problem. To fix this in XBMC Live version 10.0, I simply went to Programs, ran the audio mixer plug-in, and unmuted all the channels. I had already set the audio output to HDMI in the system settings. Suddenly we had wonderful sound.
My wife came into the room and immediately commented upon how nice the system sounded. She was hooked.
Final thoughts
We have been playing with the Zotac for about three weeks and are greatly enjoying it. The sound quality from it though the Onkyo has been amazing. We had been listening to compressed music (eg: MP3s) for so many years on inferior PC 3-ways, it was eye opening to hear CD quality sound once again, and on a quality sound system. The convenience of having all the CDs available from the couch cannot be overstated. The only downside: my wife has trouble deciding what she wants to listen to.
I was initially concerned with only ordering 2GB of RAM. This ended up being a non-issue. The Zotac spends most of its time using less than 300MB of memory.
CPU utilization ended up being less than expected. Idling, it uses just 26% of the capacity, not much more when playing media. It seems the video chip does its job very well, leaving the Atom relatively unstressed.
I plan to spend time in the coming weeks poking around more in the XBMC settings and menus. There is an incredible wealth of options available, but the beauty is that you don’t need to dig in very far to have a fully functioning system. My next few posts will dig a little deeper into XBMC and my setup.


Mike
I tried it and get stuck in some CD rom drive issues during install. How did you get round it?
Cheers
Andras
Andras,
I’m not sure I follow. Did you try to install from an internal CD? A couple more specifics and I might be able to assist.
Mike
Hi
Does it play 1080p mkv. files without any problems? and bitstream HD audio to receiver through HDMI?
I don’t have any 1080p content to test your question personally, but the forums suggest it can do so. I also have not tested HD audio.
[…] my home network. I have an XBMC box connected to our primary TV/speaker system, which is driven by media stored on an OpenFiler vm on my ESXi server. That works wonderfully and is easy enough for my children to navigate. There have been times at […]