How a missing Proxmox Backup Server led to a disappearing RAID controller, a broken retaining clip, some hardware archaeology, and the resurrection of a retired Dell PowerEdge R720.
It Started With a Bathroom
I’d spent much of the previous three weeks remodeling a bathroom. I’d replaced the old flooring, patched and painted walls, refinished the existing vanity, added a new wall cabinet, and replaced much of what made the bathroom look like it belonged in another decade.
I finally reached the point where there wasn’t much left to do. Which meant I could turn my attention back to my other projects.
I had several possibilities floating around. I needed to get back to writing articles for this site. There was also the possibility of upgrading one of my OpenMediaVault 7 installations to OMV 8, assuming an in-place upgrade would work. And I had a family-history project that I wanted to start gathering materials for.
Before doing any of that, though, I happened to notice something odd with my home lab.
My Proxmox Backup Server wasn’t behaving as expected.
That was supposed to be a quick investigation.
It wasn’t.

My Home Lab, Before Things Went Sideways
For some background, I run several older Dell PowerEdge R720 servers. I’ve written before about why I continue using these machines. They’re certainly not the newest or most power-efficient servers available, but I already own them, they’re reliable when properly maintained, and I have a considerable collection of DDR3 ECC memory and spare parts.
Two R720s have been in regular service running Proxmox VE 9.x.
One handles much of my media storage and a collection of virtual machines. The other has been used for backup-related workloads, including an OpenMediaVault instance and Proxmox Backup Server.
My backup strategy uses both Proxmox’s normal backup capabilities and PBS, with storage on local OMV systems and additional copies maintained offsite.
The machine at the center of this problem was:
- Proxmox host:
proxmox-1 - Proxmox IP:
192.168.0.141 - Hardware: Dell PowerEdge R720
- Processors: Two eight-core Xeons running at 2.7GHz
- Memory: 128GB DDR3 ECC
- RAID controller: Dell PERC H710 Mini
- Operating system: Proxmox VE 9.1, installed on an EXT4 filesystem
It had eight drives arranged into four RAID-1 virtual disks.
| Physical bays | Drive pair | Purpose |
|---|---|---|
| 0–1 | 10TB SAS | Storage mirror |
| 2–3 | ~480GB SATA SSDs | Proxmox boot mirror |
| 4–5 | 4TB SATA | Storage mirror |
| 6–7 | 12TB SATA | Storage mirror |
The other active R720 was still running normally, which initially made me think this was a problem involving PBS or one of its network connections rather than an actual server failure.
That assumption didn’t last long,
First Symptom: I Couldn’t Get Into Proxmox
I tried opening the web interface on the backup-related host:
Firefox eventually displayed a connection timeout.
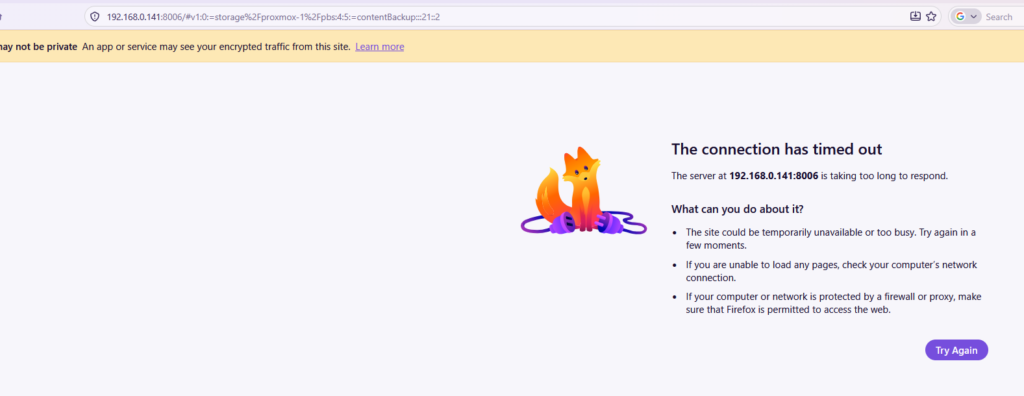
That wasn’t enough to establish what was happening. I knew from Home Assistant that the server was still powered on. iDRAC was reachable, and its power and temperature readings looked normal enough.
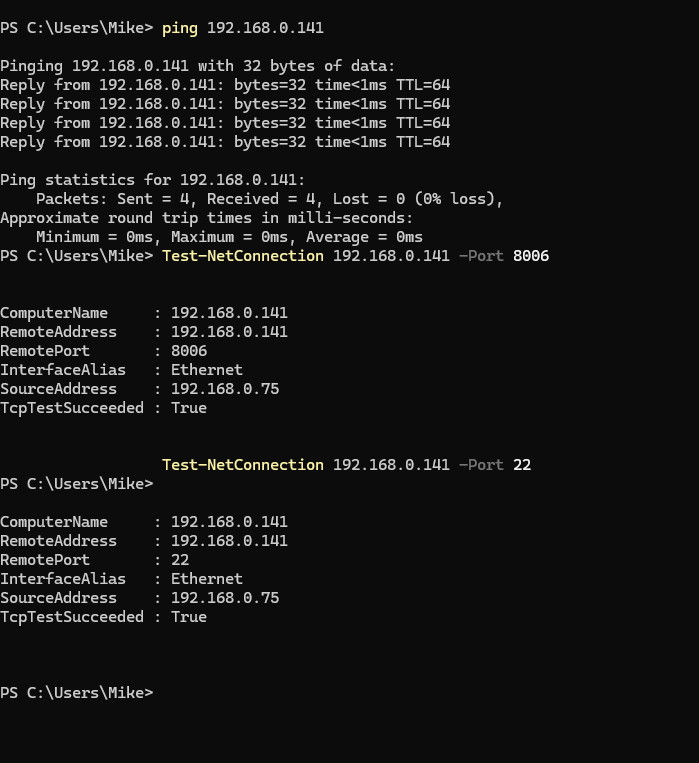
So I went to PowerShell on my desktop and started with the obvious tests.
ping 192.168.0.141That worked. Four replies, no packet loss, and response times below 1ms.
Next I tested the Proxmox management port:
Test-NetConnection 192.168.0.141 -Port 8006Surprisingly, this initially reported:
TcpTestSucceeded : TruePort 22 also appeared reachable:
Test-NetConnection 192.168.0.141 -Port 22Again, the TCP test succeeded.
So the machine was responding to ping, and the management and SSH ports appeared to be listening. Yet the web interface wouldn’t load.
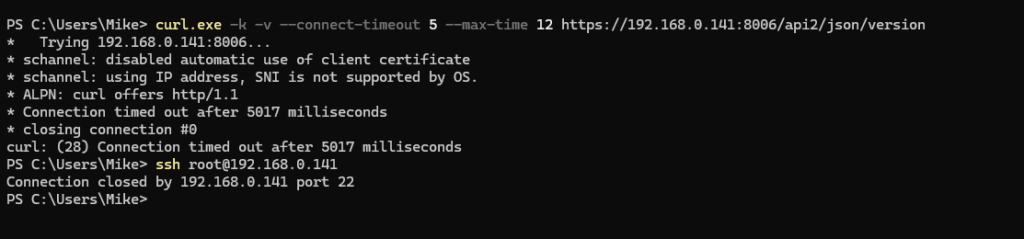
I tried retrieving the Proxmox API version directly:
curl.exe -k -v --connect-timeout 5 --max-time 12 https://192.168.0.141:8006/api2/json/versionThe connection timed out after approximately five seconds. Then I tried SSH:
ssh root@192.168.0.141That produced:
Connection closed by 192.168.0.141 port 22Now things were getting interesting.
The server wasn’t completely dead. Its network stack was responding, but I couldn’t get a usable connection to either management service.
At this point, it was becoming obvious that refreshing Firefox wasn’t going to fix anything.
Was Proxmox Backup Server Still Running?
Meanwhile, I was trying to determine what had happened to PBS.
I had previously accessed it at: 192.168.0.105:8007
I tested that address from Windows:
Test-NetConnection 192.168.0.105 -Port 8007The TCP connection succeeded, and in fact, the PBS login page appeared in the browser. But my login attempts failed.
That made the situation even more confusing. PBS might have been running, partially operational, or experiencing trouble because its underlying Proxmox host was having problems. I couldn’t yet distinguish among those possibilities.
To make matters worse, the other working Proxmox host wasn’t displaying the expected PBS backup listings. I also tested a couple of addresses that I thought might belong to OMV installations:
Test-NetConnection 192.168.0.246 -Port 80
Test-NetConnection 192.168.0.241 -Port 80
Neither responded, although I wasn’t completely certain I had the correct addresses.
I was now investigating three apparently related things: an inaccessible Proxmox host, a PBS instance whose login wasn’t working, and storage systems I couldn’t positively identify from memory.
Not exactly the small project I had envisioned.
Time to Visit the Server
Since iDRAC still worked, I initially used it to inspect the machine.
Home Assistant continued reporting approximately 140 watts of power consumption, with temperatures that didn’t suggest an immediate cooling catastrophe.
The machine was plainly still running.
I eventually went to the physical console, an older Dell 20″ from 2007, housed in my server rack. It made a horrible screeching noise when it was clicked on… and promptly died. Likely a failed power supply. Fortunately, I had dual monitors set up on the main level for troubleshooting desktops. I pulled one of the two and placed into server console duty.
Apparently, troubleshooting one hardware failure wasn’t going to be enough for the day.
Once powered on, Proxmox was displaying its familiar welcome message:
Welcome to the Proxmox Virtual Environment.

https://192.168.0.141:8006/
That looked encouraging. I was able to log in as root, but running ordinary Linux commands revealed something much more serious.
I tried checking the mounted filesystems:
findmnt -no SOURCE,FSTYPE,OPTIONS /Instead of the expected filesystem information, Bash reported an input/output error trying to execute findmnt. I then tried inspecting the kernel log:
dmesg -T | grep -Ei 'I/O error' | tail -n 80That also failed with an input/output error executing dmesg. This was no longer looking like a problem with pveproxy, PBS, or even networking.
Linux couldn’t reliably read executable files from its own operating-system disk.
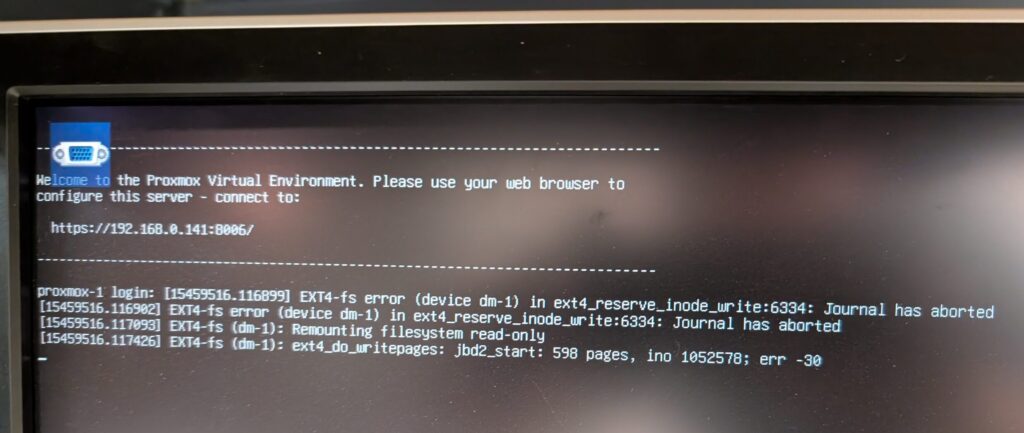
Then I noticed the kernel messages appearing on the physical console:
EXT4-fs error (device dm-1) in ext4_reserve_inode_write:6334:
Journal has aborted

EXT4-fs (dm-1): Remounting filesystem read-only

EXT4-fs (dm-1): ext4_do_writepages:
jbd2_start: 598 pages, ino 1052578; err -30
Those were the important clues. The EXT4 journal had aborted, and the filesystem had been remounted read-only. Error -30 corresponds to a read-only filesystem, it turns out.
This explained why the machine could still display a login screen and respond to some network traffic while being unable to perform normal operations.
It did not, however, tell me why the filesystem had failed. A damaged EXT4 filesystem was one possibility. An underlying storage problem was another.
Even Rebooting Was a Problem
I thought a restart might help determine whether the failure was transient, so I tried:
systemctl rebootInstead of restarting, the system reported:
Call to Reboot failed: Access deniedI then tried:
syncThat failed too:
-bash: /usr/bin/sync: Input/output errorWhen a Linux system can’t reliably run sync, things have become rather unpleasant. I resorted to iDRAC to restart the machine, only to discover that the problem was considerably worse than a corrupted filesystem.
The RAID Controller Disappeared
During startup, the R720 displayed:
Alert! System fatal error during previous boot
PCI Express Error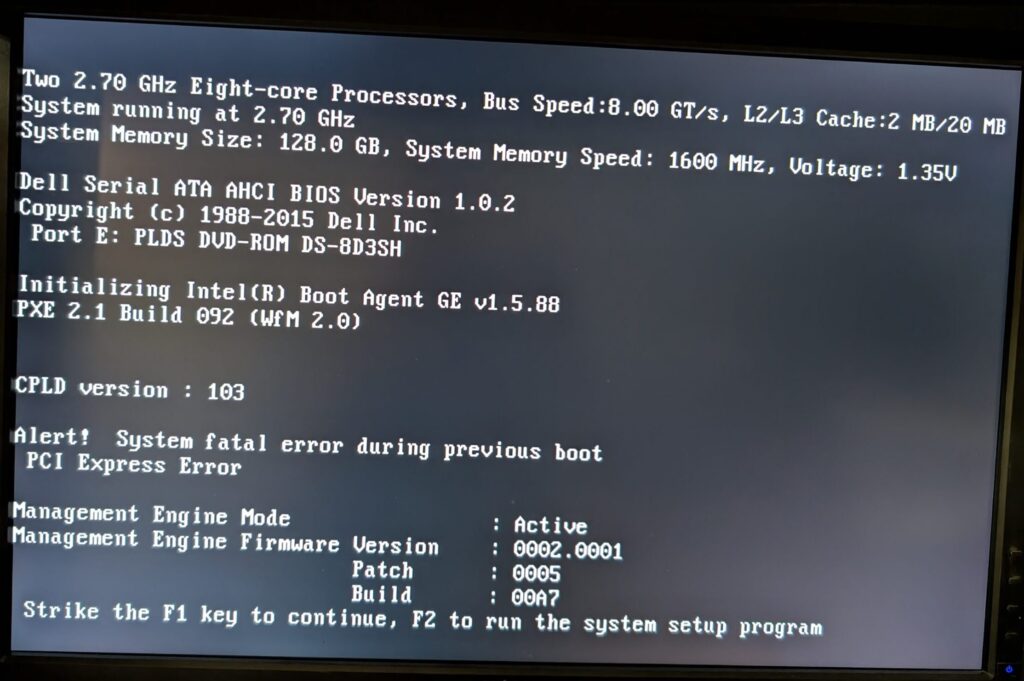
The iDRAC System Event Log contained fatal bus errors, including references to bus 0/device 2/function 2 and bus 2/device 0/function 0. The server also failed to find a boot device and eventually attempted PXE booting:
PXE-E53: No boot filename received

PXE-M0F: Exiting Intel Boot Agent.

No boot device available.
Current boot mode is set to BIOS.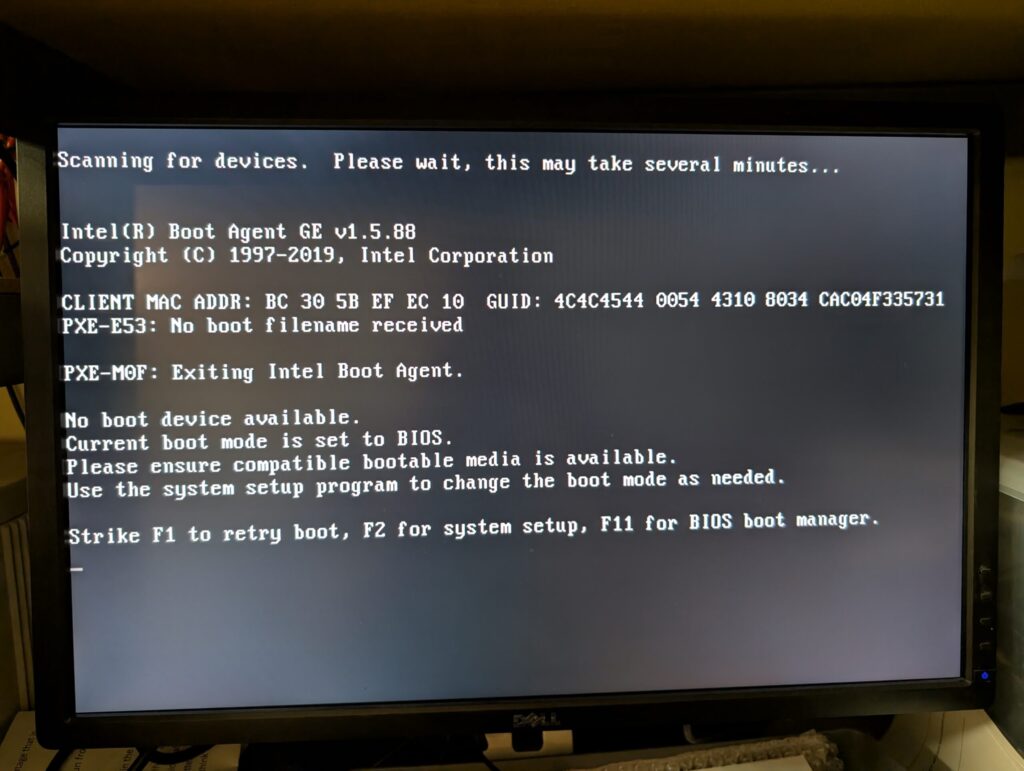
That was an unpleasant development. I entered the BIOS Boot Manager with F11, but the usual RAID boot device was missing. The available boot choices included the optical drive, network boot, and virtual media, but nothing usable from the PERC controller.
I also checked iDRAC’s storage pages. Before the restart, iDRAC had shown the eight physical drives and their RAID arrays as Online. Following the restart, however, the controller and drives were no longer being detected. The storage overview now reported zero physical disks and zero virtual disks, along with an error indicating that no compatible storage controllers could be found.
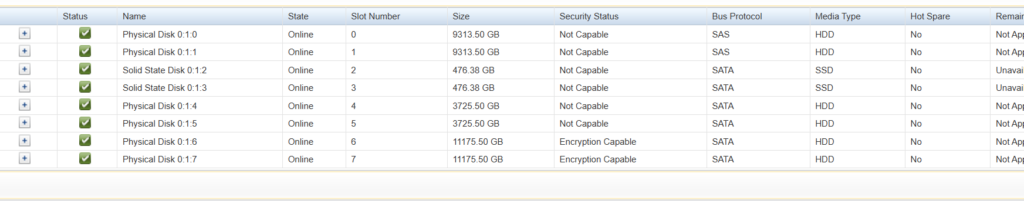
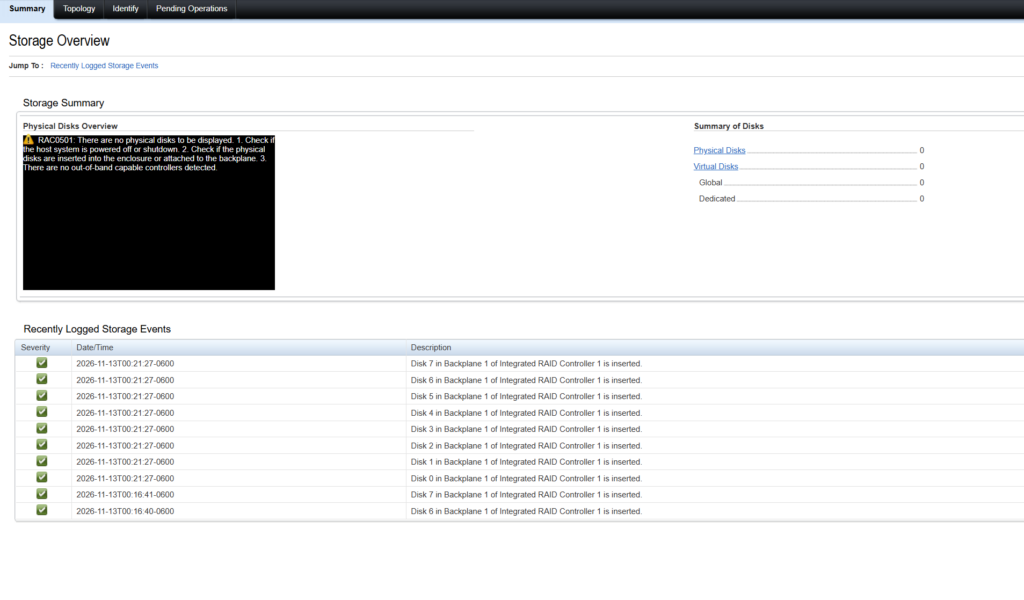
The controller itself had disappeared.
What Had Actually Failed?
The evidence increasingly pointed toward the storage-controller path. That could have meant:
- The PERC H710 Mini itself had failed.
- Its dedicated motherboard connection was defective.
- A related motherboard or PCIe fault was preventing the controller from initializing.
I couldn’t conclusively distinguish among those possibilities, but I knew the controller was absent from BIOS and iDRAC, and the server couldn’t boot from any of its eight drives.
This was a hardware problem until proven otherwise.
I Broke Something While Investigating
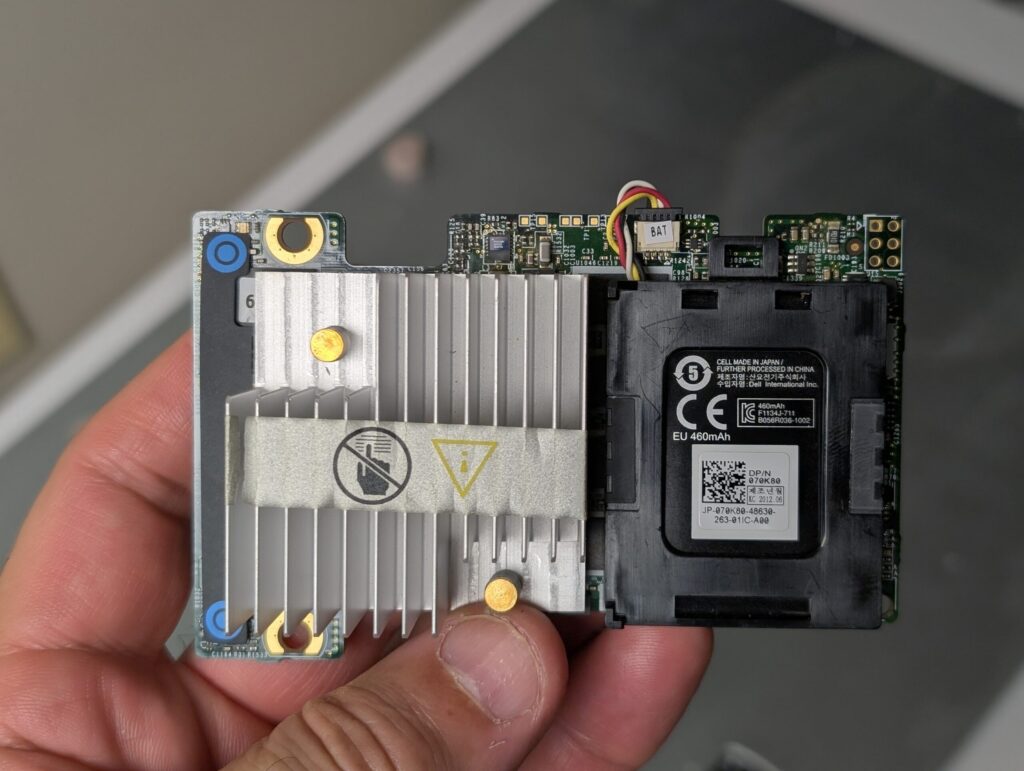
I opened the R720 and located the H710 Mini. Unlike a conventional full-length PCIe RAID card, the H710 Mini occupies a dedicated connector on the motherboard, beneath a heatsink.
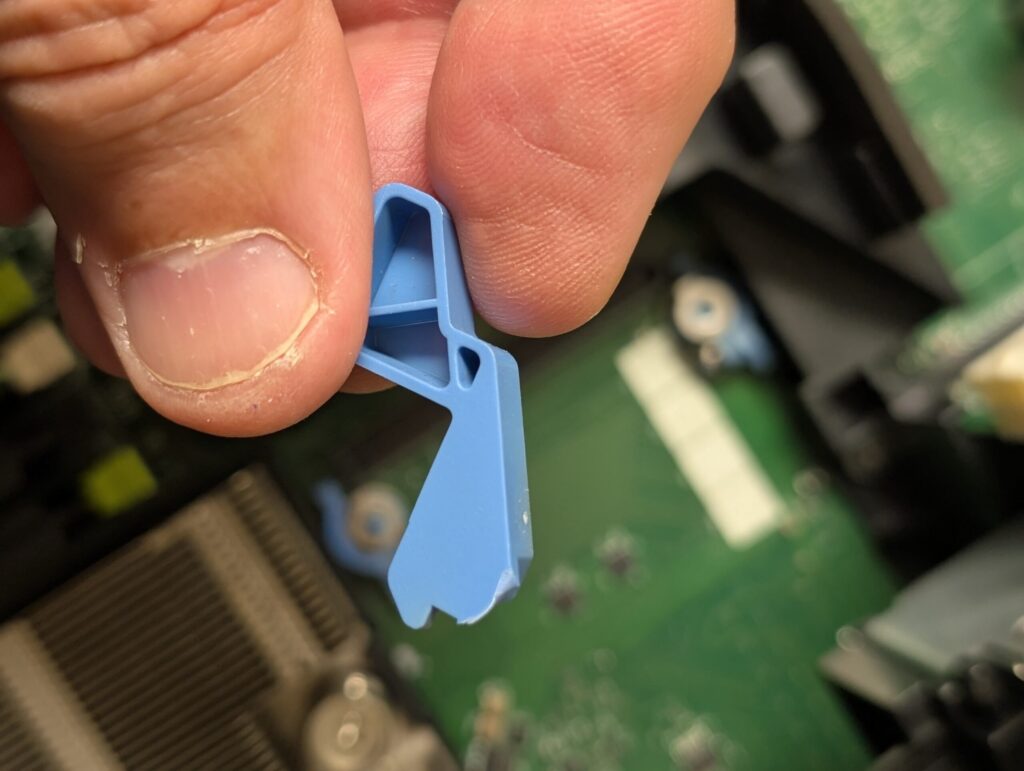
I attempted to reseat it. That was when one of the small blue retaining clips broke.
Wonderful.
I photographed the broken plastic piece, the controller connector, and the motherboard mounting arrangement. The clip hadn’t caused the original failure, since it broke afterward during troubleshooting. But now, even if I replaced the H710, I couldn’t be certain it would remain properly seated in the motherboard.
That gave me another reason to question whether I could trust this server going forward.
I tried reseating the controller anyway. The server still couldn’t detect it. Grrr.
At this point, I disconnected everything from the failed R720, removed it from the shelf, and found a spot on the basement floor for it. I wasn’t getting anywhere with that machine for the moment.
Repair the R720, or Replace the R720?
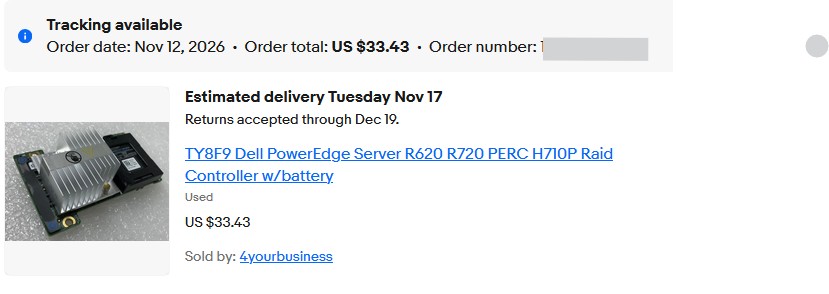
My first instinct was to replace the H710, so I started looking at used H710 and H710P Mini controllers on eBay. I wanted a functioning unit with a battery, not an as-is controller of questionable condition. I also encountered the familiar hazards of buying older enterprise hardware online: incomplete descriptions, photographs showing accessories that weren’t explicitly included, and return policies requiring the buyer to pay shipping. You need to pay attention to everything in the listing.
I eventually ordered a replacement controller from an eBay seller named 4YourBusiness.
But while investigating the broken retaining clip, another possibility occurred to me.
I already owned another Dell PowerEdge R720.
It had been decommissioned, had no drives installed, and was sitting in my sump room on an elevated rack. What if I simply moved all eight drives into that machine? I wouldn’t need to replace the RAID controller or repair the broken clip on the original motherboard. I’d gain another benefit, too: the spare R720 had more RAM (192GB) and more powerful processors (Xeon E5-2680 v2s versus the v1 processors in the original R720).
It seemed like a much better use of hardware I already owned. There was just one complication: I couldn’t quite remember why I’d retired that particular R720.
Some Hardware Archaeology
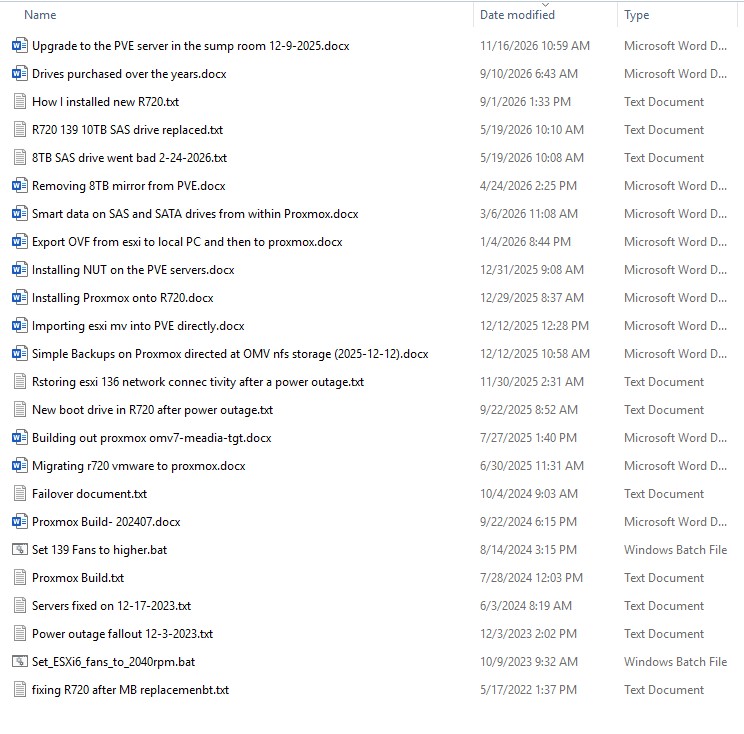
This is where my habit of keeping technical notes became extremely useful. I have a folder on my Dodeca where I’ve accumulated years of scripts, troubleshooting notes, and other technical documents.
I started digging through old Word documents and text files, along with photographs I’d taken over the years. I also went through the spare server’s iDRAC event logs. Between those sources, I found records dating back to December 2023 that helped explain some of the machine’s history.
At that time, its operating-system address was 192.168.0.130, while its iDRAC address was 192.168.0.129. Following an extended power outage, I’d recorded a power-supply fan problem and a networking failure. The root cause of the networking trouble had been an improperly seated PCIe network adapter in slot 5. I’d temporarily moved cables to other ports, only to discover that some of the onboard interfaces weren’t enabled in BIOS.
Two weeks later, on December 17, 2023, I documented another visit to the rack. The add-in NIC was visibly crooked, so I reseated it. CPU 2 had also been reaching approximately 200°F, so I removed the heatsink, cleaned off the old thermal compound, applied fresh Arctic Silver, and reinstalled it. The temperatures returned to normal afterward.
Then I examined the spare server’s iDRAC history. On June 30, 2025, it recorded multiple fatal PCIe errors involving slot 5. That was the very slot I’d documented as having trouble with the network adapter back in 2023. I also found June 2025 entries reporting CPU throttling.
At first, those warnings made me wonder whether this spare was actually a good candidate for recovery. But digging further into my files revealed that June 30, 2025, was when I was migrating that server from VMware ESXi to Proxmox. And on July 27, 2025, I had shut it down.
It was entirely possible that I’d subsequently moved the troublesome PCIe card to another machine or removed it while decommissioning the server. I couldn’t prove that from the logs. In fact, iDRAC’s limited network inventory and Linux’s later detection of additional network interfaces showed why I shouldn’t assume a card was physically absent merely because iDRAC didn’t list it.
What I did establish was that the spare’s historical PCIe slot-5 errors had a reasonable explanation.
I also found October 2024 photographs showing PERC battery maintenance and CPU thermal-paste work on my other active R720. That helped me avoid confusing the maintenance histories of several similar-looking servers.
There’s a lesson here: when you own multiple nearly identical machines and keep moving components between them, dated notes become invaluable.
I do wish I’d left a printed note with the spare R720 listing its hardware and why I’d removed it from service. I’d already been doing that with retired desktops and workstations, but apparently hadn’t thought to do the same with my servers. I am now.
Powering Up the Spare R720
Before committing to moving eight drives into a machine that had been sitting unused for more than a year, I wanted some assurance that it was actually functional.
I reconnected power to the spare R720 in my sump room and accessed its iDRAC interface at 192.168.0.129. With the server initially powered off, I could review its hardware inventory and historical event logs without involving any of the existing Proxmox disks.
The firmware inventory identified BIOS version 2.7.0, iDRAC 2.65.65.65, and a PERC H710 Mini running firmware 21.3.5-0002. It also recognized the integrated Intel I350 network adapter. That was a good start, but I still wanted to see whether the controller actually worked.
I powered on the server and watched it initialize. POST identified two ten-core Xeon E5-2680 v2 processors running at 2.8GHz and 192GB of DDR3 memory. Back in iDRAC, the health indicators for fans, temperatures, voltages, batteries, and power supplies were all green. More importantly, the startup tests hadn’t produced any new fatal PCIe errors or CPU-throttling warnings.
There was one oddity. The iDRAC storage-controller page displayed error RAC0503, indicating that no out-of-band-capable controllers were available to display. Given what had happened to the original R720, that wasn’t particularly reassuring.
But entering the PERC BIOS configuration utility using Ctrl+R told a different story. The H710 Mini initialized successfully and appeared at Bus 0x02, Device 0x00. Its configuration screen reported:
No Configuration Present!

Disk Groups:    0
Virtual Disks:  0
Physical Disks: 0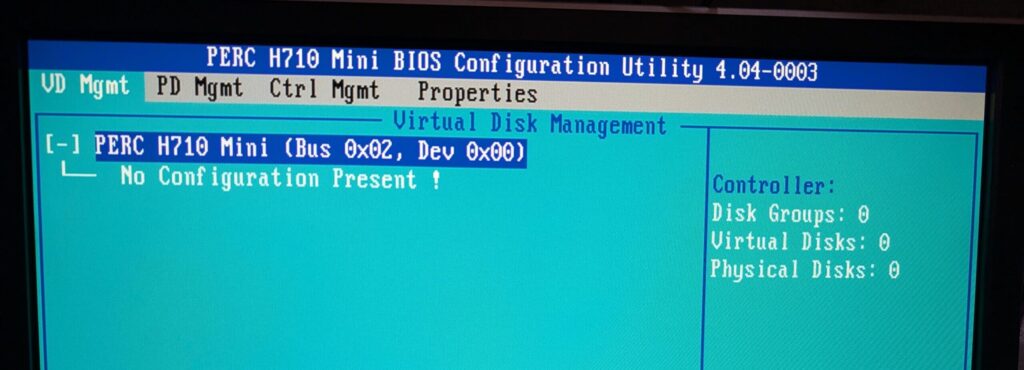
For once, seeing zero disks was exactly what I wanted. The spare had no drives installed, and the RAID controller was responding normally.
I also discovered that the spare was configured for UEFI boot, while my existing Proxmox installation used legacy BIOS. I changed the boot mode to BIOS so the replacement chassis would match the installation I intended to recover.
None of this guaranteed that the retired R720 was free of problems. I hadn’t performed an extended hardware stress test, and its old PCIe errors were still worth keeping in mind. But the controller was functioning, the hardware health readings looked good, and the test boots hadn’t produced new errors.
That was enough reassurance to attempt the drive migration.
Moving Eight Drives Into the Spare R720
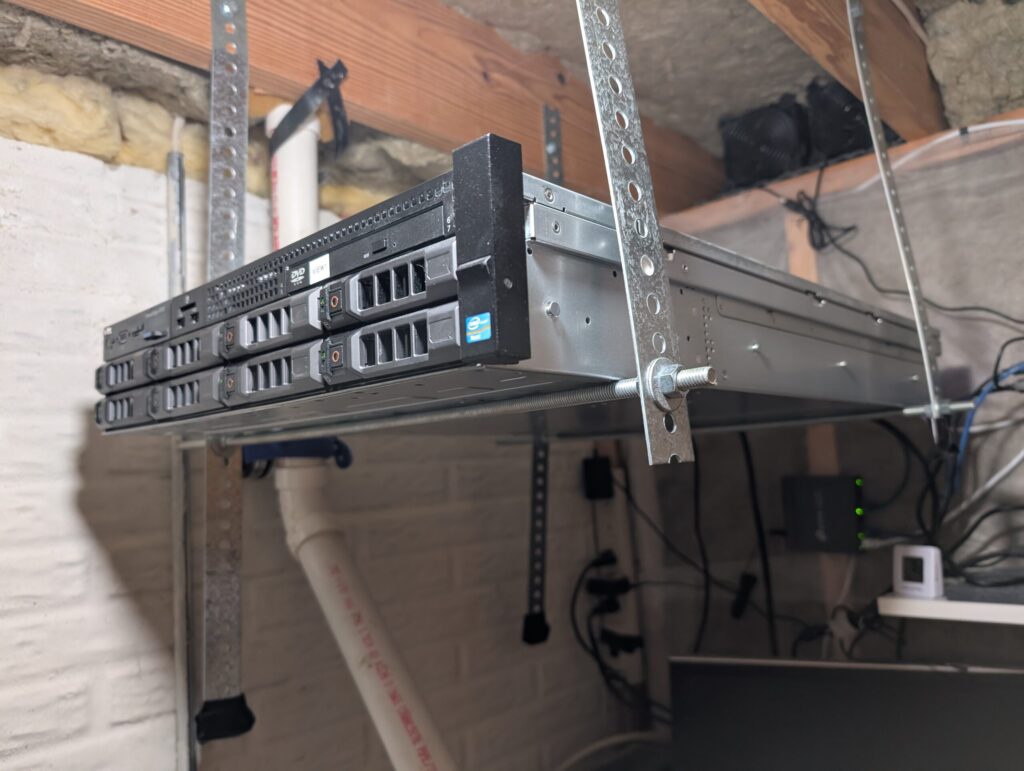
Before doing anything with the drives, I powered off both servers and disconnected their power cords. I photographed the original bay arrangement, then moved all eight drives from the failed R720 into the corresponding numbered bays of the spare.
I deliberately kept the drive positions unchanged:
Bay 0: 10TB SAS
Bay 1: 10TB SAS

Bay 2: SSD
Bay 3: SSD

Bay 4: 4TB SATA
Bay 5: 4TB SATA

Bay 6: 12TB SATA
Bay 7: 12TB SATA
The pairs were already members of four RAID-1 arrays. I wasn’t trying to create new arrays, initialize disks, or reconstruct storage manually. I wanted the replacement controller to recognize and import the existing RAID configuration stored on the drives.
A Very Encouraging Message: Foreign Configuration Found
When I powered on the replacement server, its H710 Mini initialized successfully. Then the BIOS displayed:
Foreign configuration(s) found on adapterThis was exactly what I’d hoped to see. The PERC controller recognized RAID metadata belonging to another controller and offered to import the foreign configuration immediately or enter the configuration utility.
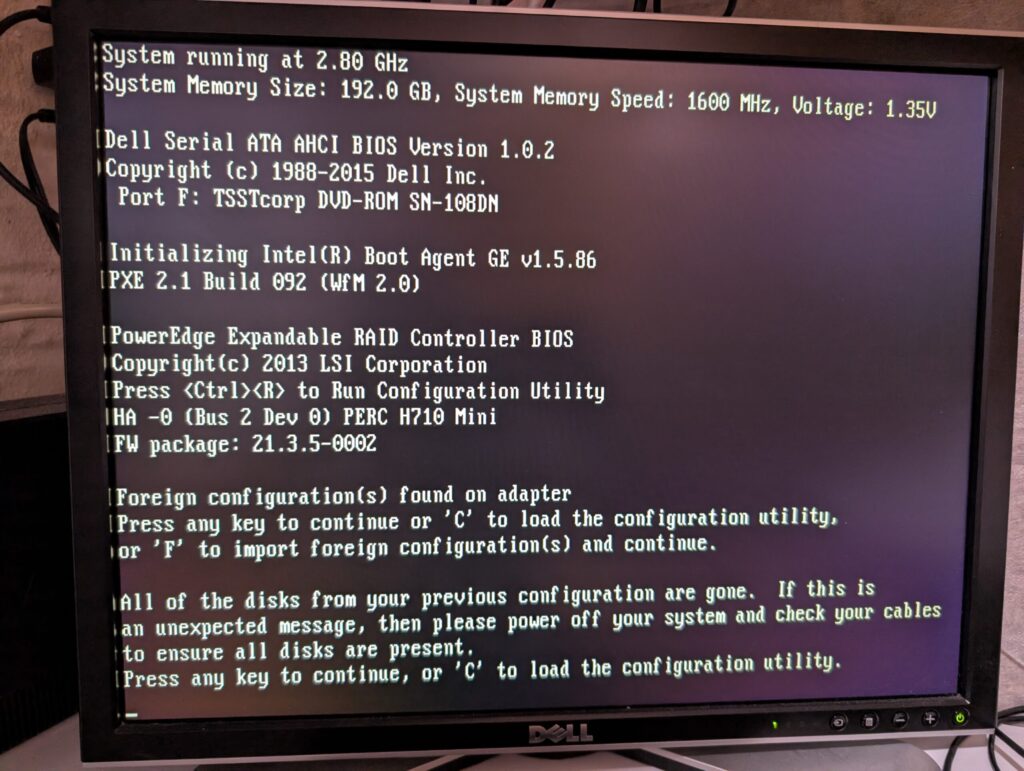
I chose the configuration utility instead. I wanted to see precisely what had been detected before accepting anything that could affect the contents of the disks.
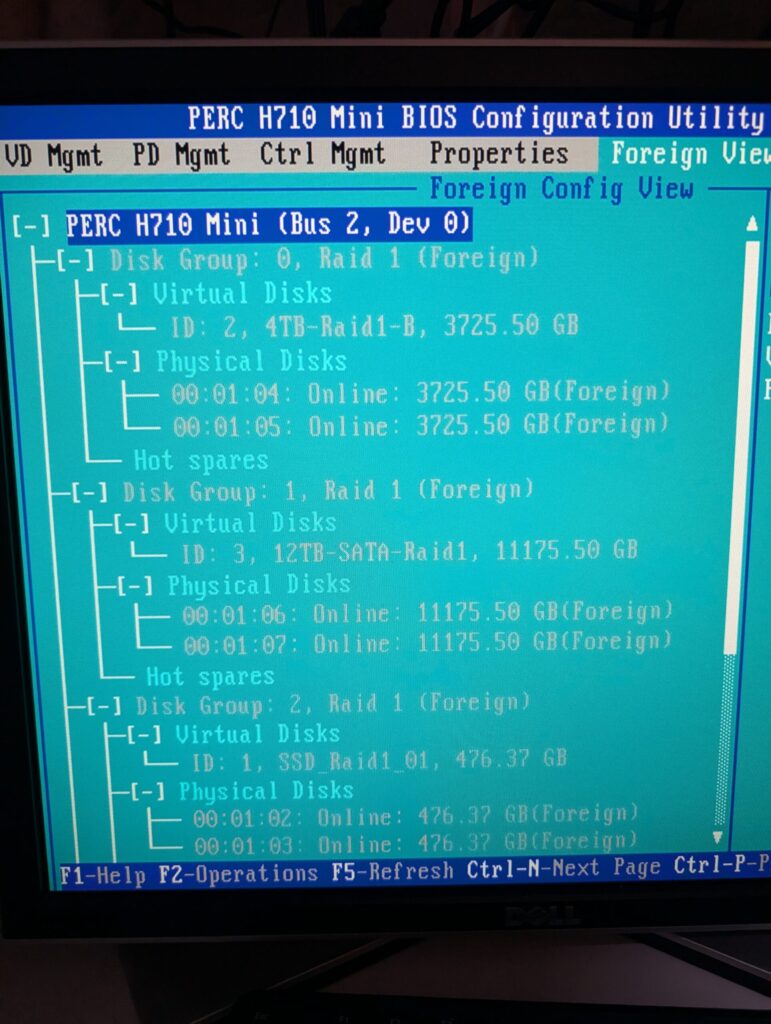
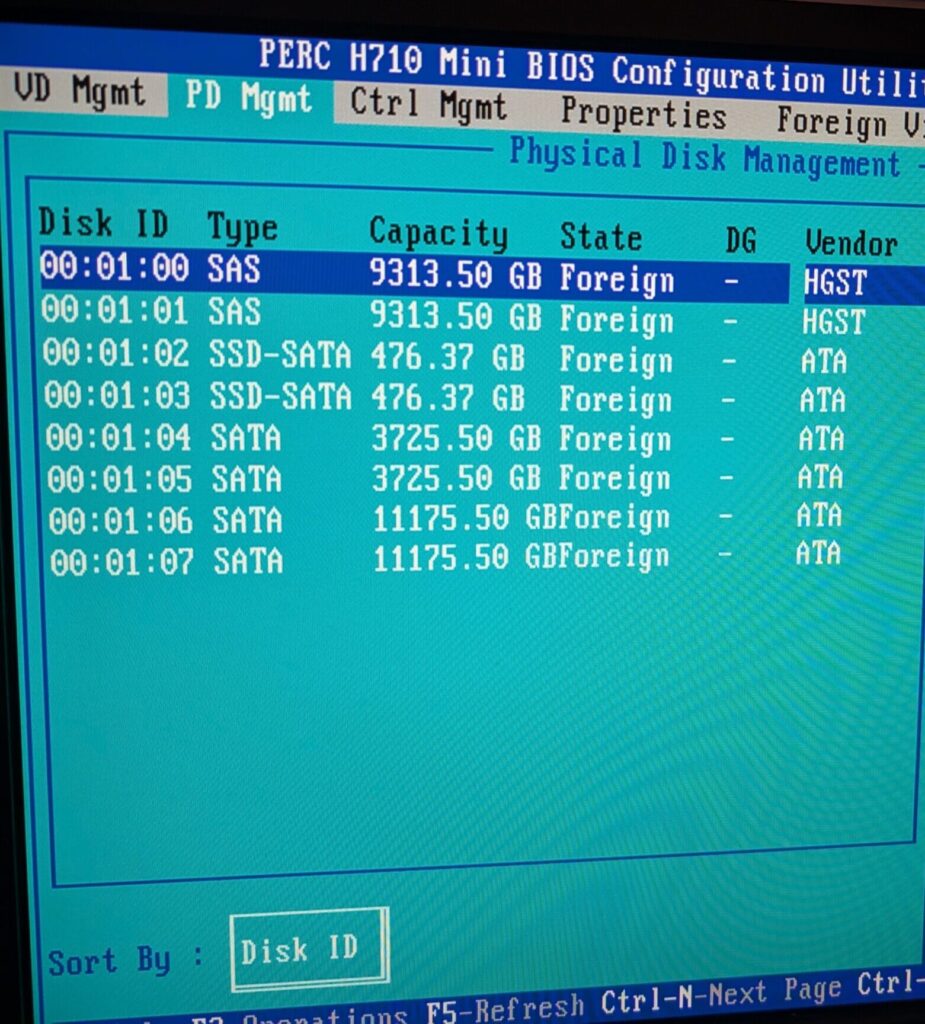
In Foreign View, the controller displayed four disk groups and four virtual disks.
| Virtual disk | RAID level | Reported size |
|---|---|---|
HGST_10TB | RAID-1 | 9,313.50 GB |
SSD_Raid1_01 | RAID-1 | 476.37 GB |
4TB-Raid1-B | RAID-1 | 3,725.50 GB |
12TB-SATA-Raid1 | RAID-1 | 11,175.50 GB |
All eight physical drives appeared with the expected capacities. I expanded the Physical Disks entries under each disk group and verified that every mirror had both members present.
For example, the SSD mirror showed disks 00:01:02 and 00:01:03, each Online and marked Foreign. The other groups similarly contained the correct pairs, and nothing appeared missing or failed.
That was a major relief.
Importing the RAID Configuration
From VD Mgmt, I highlighted the controller, pressed F2, and selected Foreign Config → Import. I specifically avoided the options to clear the foreign configuration, create virtual disks, or initialize anything.
The import completed successfully. Back in VD Mgmt, the four disk groups appeared as normal RAID-1 configurations rather than Foreign configurations. More importantly, all four virtual disks reported Optimal. The controller had recovered the array definitions without recreating anything.
Next, under Ctrl Mgmt, I verified the selected boot device:
VD 1 — 476.37 GBThat was the Proxmox SSD mirror. The correct boot disk was already selected, so there was nothing to change.
The RAID arrays looked good. I was still concerned about the EXT4 errors, though.
The original Proxmox system had reported an aborted EXT4 journal and read-only filesystem errors. Even though the RAID arrays were now Optimal, I didn’t know whether the boot filesystem had survived intact.
Checking the Proxmox Filesystem Before Booting
I located my Proxmox VE 9.1 installation media. Rather than immediately booting the installed operating system and potentially starting several virtual machines, I decided to check the root filesystem from a recovery environment.
I booted the Proxmox installer and selected Advanced Options → Install Proxmox VE (Terminal UI, Debug Mode). Despite the name, I wasn’t reinstalling anything. Debug Mode pauses startup at command shells that can be used for troubleshooting. I wanted access to the disk utilities without mounting the existing Proxmox root filesystem read-write.
The first debug shell was extremely limited. I initially tried:
lsblk -o NAME,SIZE,TYPE,FSTYPE,MOUNTPOINTSThe command wasn’t available yet, so I entered:
exitThat advanced the installer to its next debugging stage, where I reached a fuller shell with normal storage utilities. This time, I could run:
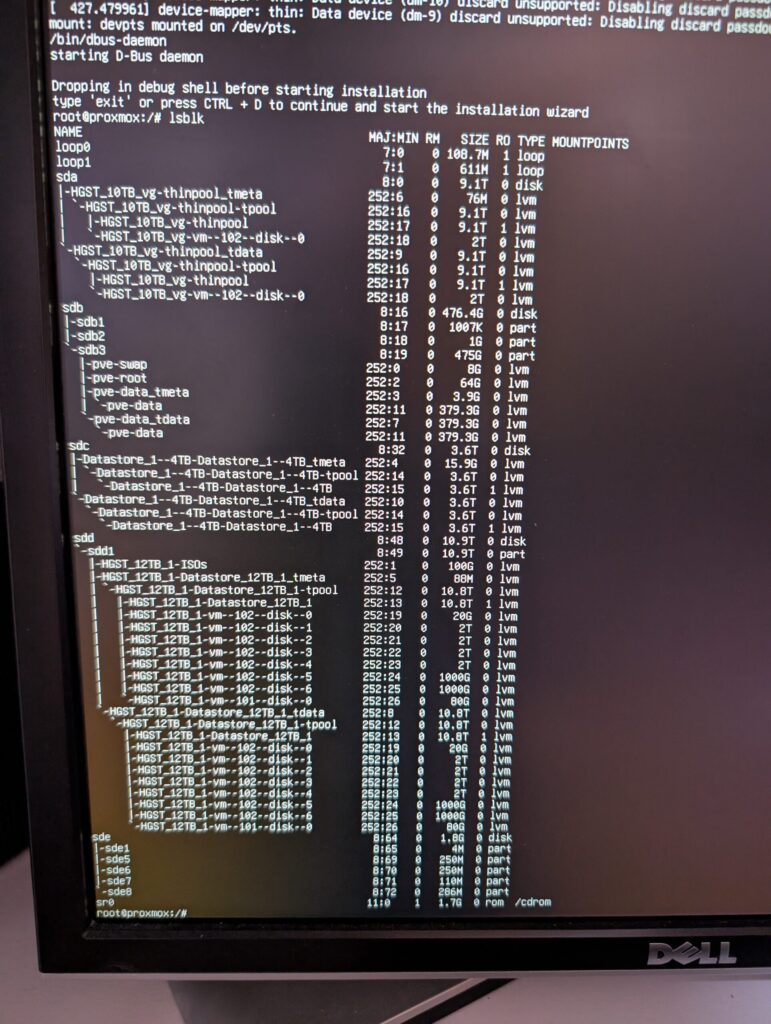
lsblkThe output showed all four imported RAID virtual disks and their existing LVM structures. This was another excellent sign.
The 476GB SSD mirror appeared as /dev/sdb, containing the expected Proxmox partitions and LVM volumes. The other virtual disks appeared as /dev/sda, /dev/sdc, and /dev/sdd. These device names were specific to that recovery boot and shouldn’t be assumed to remain the same on another system.
The important parts of the output were:
sdb             476.4G
├─sdb1
├─sdb2            1G
└─sdb3          475G
  ├─pve-swap       8G
  ├─pve-root      64G
  └─pve-data     379.3G
The other storage arrays also exposed their existing LVM-thin pools and virtual-machine disks.
For example, the 12TB array contained multiple vm-102-disk-* volumes, while the 10TB array contained another VM disk.
The data structures were still there.
Confirming the Root Filesystem
I identified the filesystem on the SSD mirror:
lsblk -f /dev/sdbThis confirmed that:
pve-root ext4I then checked whether the root volume was mounted:
findmnt /dev/mapper/pve-rootIt returned no mount information.
That was what I wanted. An EXT4 repair must not be run against a mounted, active root filesystem.
First: A Read-Only Check
I started with:
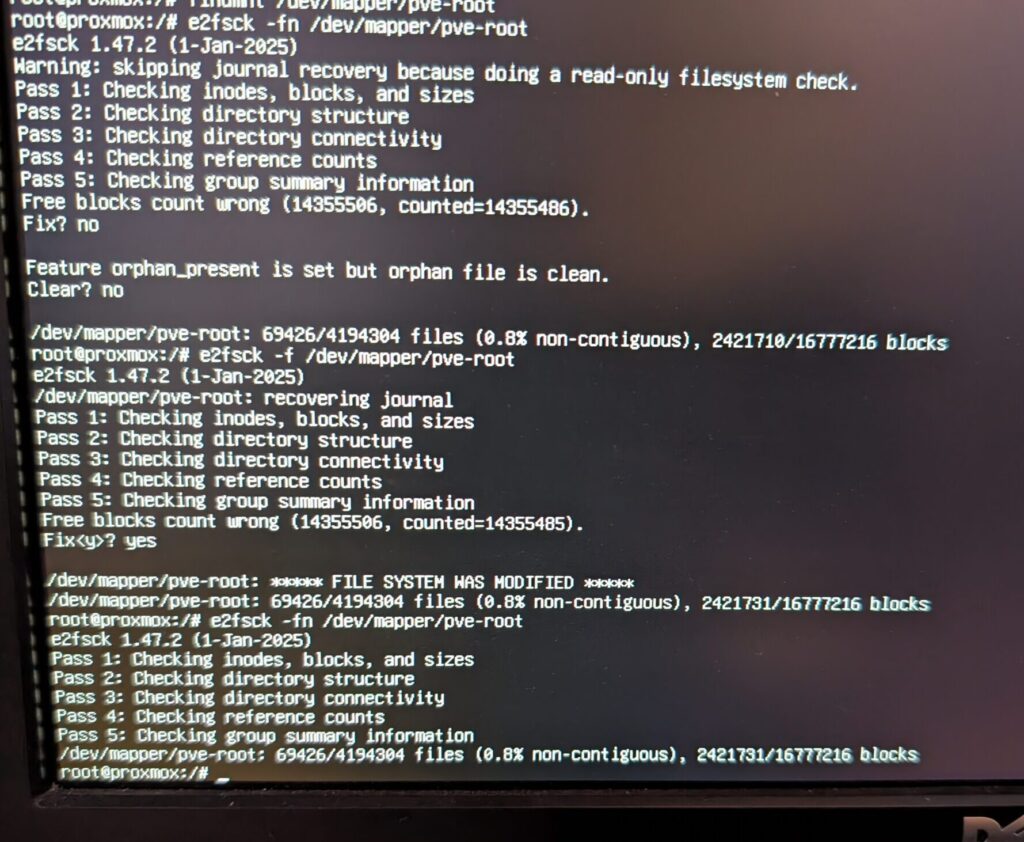
e2fsck -fn /dev/mapper/pve-rootThe -f forces a check, while -n prevents the utility from making repairs.
It reported:
Warning: skipping journal recovery because doing a read-only filesystem check.All five passes completed:
- Checking inodes, blocks, and sizes
- Checking directory structure
- Checking directory connectivity
- Checking reference counts
- Checking group summary information
The check identified a free-block-count discrepancy:
Free blocks count wrong (14355506, counted=14355486).It also reported:
Feature orphan_present is set but orphan file is clean.Because this was a read-only check, I declined the offered corrections.
Importantly, there were no reports of widespread inode corruption, major directory failures, or unreadable filesystem blocks.
That was much better than I feared.
Then: The Actual Repair
After considering whether to image the 64GB root volume first, I decided the risks were acceptable. The RAID hardware was Optimal, the filesystem was unmounted, and the read-only check had revealed relatively modest inconsistencies.
I ran:
e2fsck -f /dev/mapper/pve-rootThis time, the utility reported:
/dev/mapper/pve-root: recovering journalIt proceeded through the filesystem checks, again finding an incorrect free-block count and asking whether to fix it. I answered Yes, and the utility reported:
***** FILE SYSTEM WAS MODIFIED *****I wasn’t going to assume that meant everything was fixed, so I ran the check again:
e2fsck -f /dev/mapper/pve-rootThis time it completed all five passes without errors or additional repair prompts. That was exactly what I wanted.
The EXT4 filesystem was now structurally consistent according to e2fsck. It didn’t guarantee that every application file or every interrupted write had survived, but it meant the filesystem itself was in good enough shape to attempt booting.
Rebooting From the Debug Shell
Having finished the repair, I attempted to reboot:
rebootThat produced another surprise:
System has not been booted with systemd as init system (PID 1).
Can't operate.

Failed to connect to bus:
Host is down
This wasn’t a new storage problem.
I was running inside the Proxmox installer’s debugging environment, which wasn’t operating under the normal systemd init process. Easy to miss.
A forced reboot was the appropriate next step:
sync
reboot -f
I removed the installation media and allowed the server to boot from its disks.
And then I got yet another surprise. Instead of Proxmox, the R720 booted VMware ESXi 5.5.
Yes, ESXi 5.5.
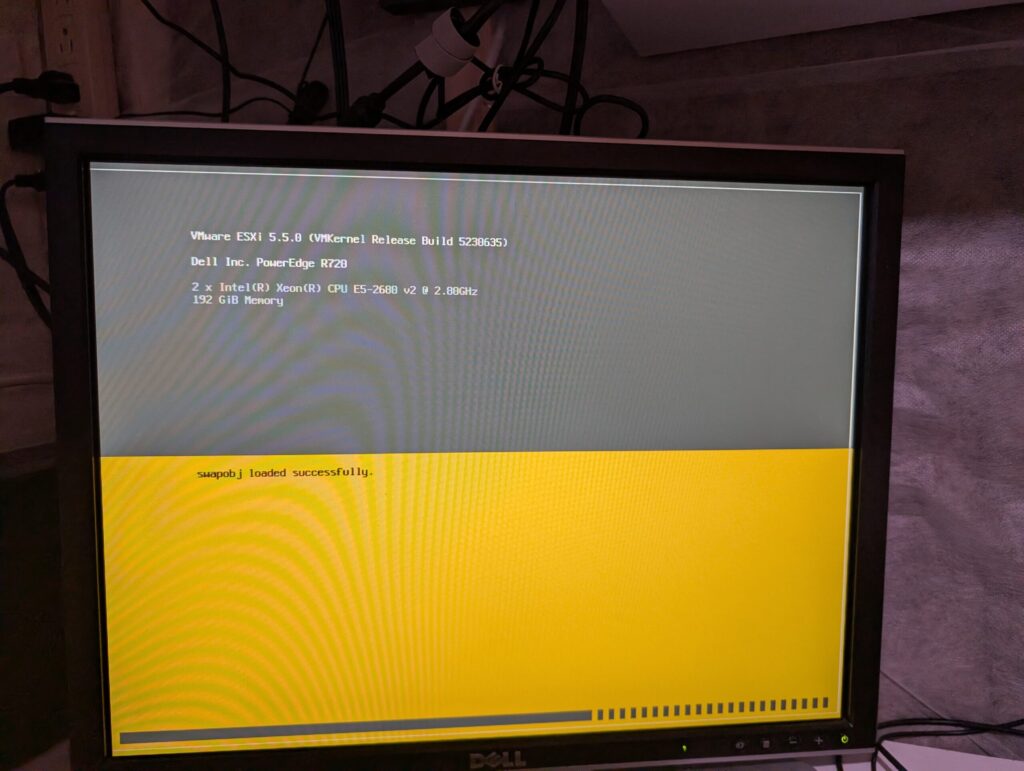
I knew the server had an internal dual-SD module that housed its ESXi installation but had not paid close enough attention during the recovery boot to make the change. After importing the PERC RAID configuration and repairing the Proxmox filesystem, the system had decided to boot from the old SD card instead.
At least I now knew the SD module still worked.
Fixing the BIOS Boot Order
I entered the R720 BIOS setup using F2 and navigated to System BIOS → Boot Settings → BIOS Boot Settings. The main Boot Sequence contained Hard drive C:, but the more important setting was Hard-Disk Drive Sequence, which listed:
Integrated RAID Controller 1: PERC H710 Mini
Internal SD: Internal Dual SD
I moved the integrated RAID controller ahead of the internal SD module, leaving Hard drive C: enabled and first in the main boot sequence. After saving the changes and rebooting, the system finally started Proxmox.
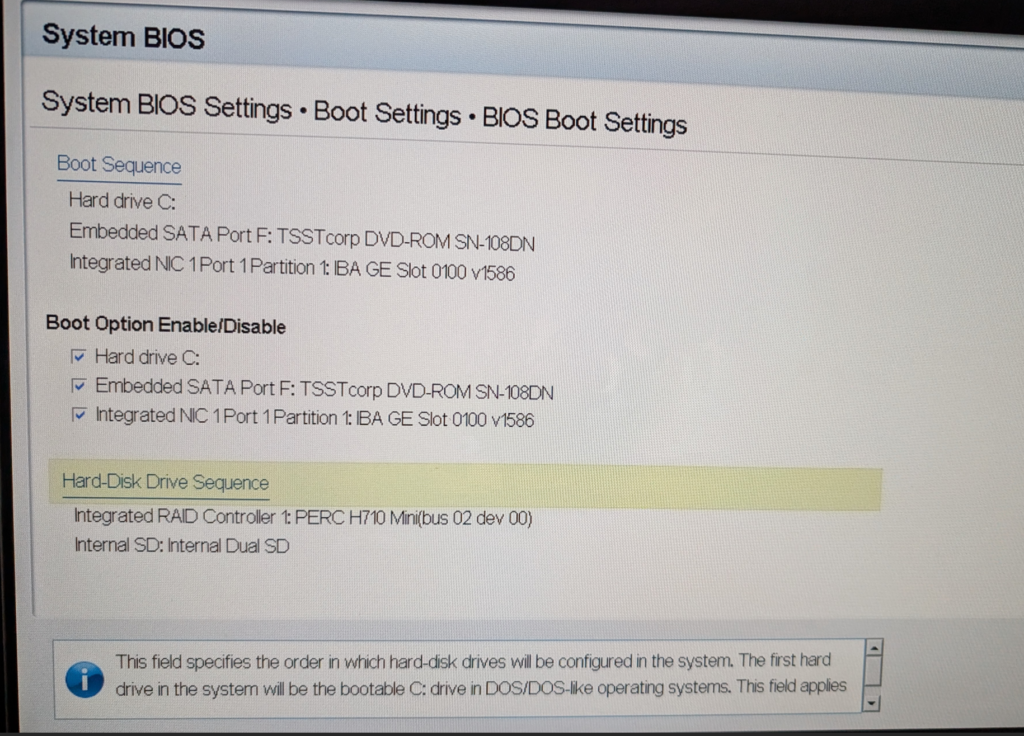
The console displayed:
Welcome to the Proxmox Virtual Environment.

https://192.168.0.141:8006/
The normal login prompt appeared, and after all the hardware trouble, I finally had a bootable Proxmox installation again.
Unfortunately, I still couldn’t reach its web interface.
Proxmox Was Running, but Networking Wasn’t
At this point, I could log into Proxmox from the physical console, but my browser still couldn’t reach port 8006. This time, though, the reason was different.
I checked iDRAC’s network inventory and found that all four ports on the integrated Intel I350 network adapter showed Down. There were no link lights initially. Due to the server’s location in the room, I had to use a mirror to look at its rear panel to confirm no lights.
Because the physical server had changed, I suspected the old Proxmox network configuration might not match what was in the replacement server. I logged into the Proxmox console and ran:
ip -br linkLinux detected eight physical Ethernet interfaces:
enp5s0f0
enp5s0f1
enp6s0f0
enp6s0f1

eno1
eno2
eno3
eno4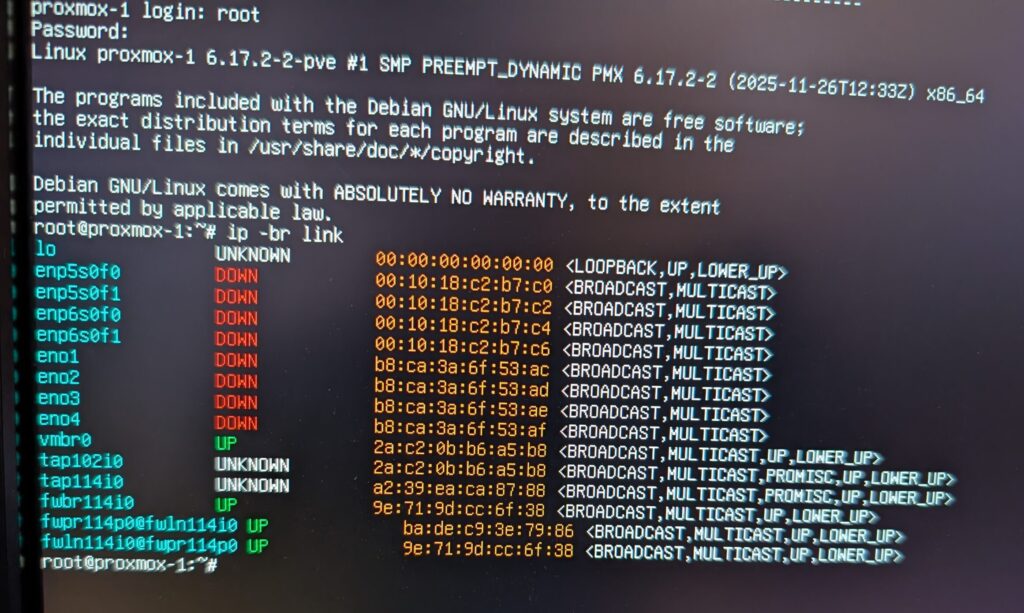
The four eno interfaces corresponded to the integrated Intel I350 adapter, while four additional enp interfaces were associated with other network hardware. This was a useful reminder that iDRAC’s network-device inventory is not necessarily a complete list of every network interface Linux can detect.
The virtual bridge vmbr0 appeared UP, but the physical interfaces were DOWN. I inspected the existing Proxmox networking configuration:
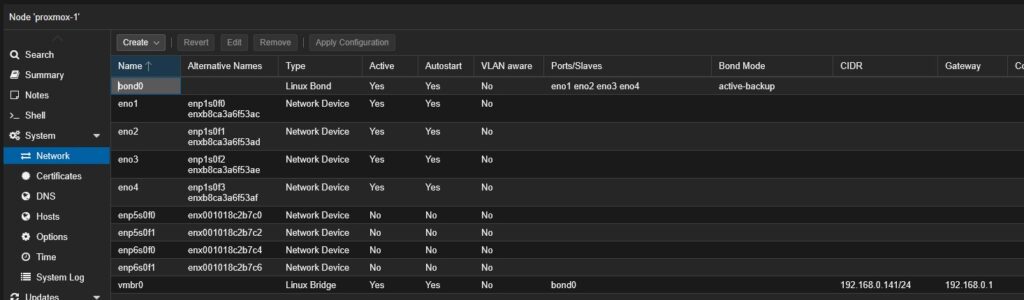
cat /etc/network/interfacesAnd there was the problem. My original server had used a four-port active-backup Linux bond, and the configuration still contained:
auto nic0
iface nic0 inet manual

auto nic1
iface nic1 inet manual

auto nic2
iface nic2 inet manual

auto nic3
iface nic3 inet manual

auto bond0
iface bond0 inet manual
    bond-slaves nic0 nic1 nic2 nic3
    bond-miimon 100
    bond-mode active-backup
    bond-primary nic0
But the replacement server had no interfaces named nic0, nic1, nic2, or nic3. Instead, it had eno1 through eno4.
The bridge itself was configured correctly in terms of its IP address:
auto vmbr0
iface vmbr0 inet static
    address 192.168.0.141/24
    gateway 192.168.0.1
    bridge-ports bond0
    bridge-stp off
    bridge-fd 0
But the bond was referencing nonexistent physical interface names.
The bridge could still report UP even though it had no functioning physical path to the rest of the network.
Testing the Integrated NIC
Before editing anything, I brought up one of the integrated ports manually:
ip link set eno1 upThen checked it:
ip -br link show eno1The output showed eno1 as UP with the LOWER_UP flag, confirming that Linux was detecting an active physical Ethernet link.
I also attempted to check link status with:
ethtool eno1 | grep -i "Link detected"The clearest confirmation in the captured output was the LOWER_UP flag. This was encouraging. I wasn’t chasing another dead card or disconnected RAID controller. At least one integrated Ethernet port was functioning.
Correcting the Network Bond
First, I preserved a copy of the existing network configuration:
cp -a /etc/network/interfaces /etc/network/interfaces.bakThen opened it for editing:
nano /etc/network/interfacesI replaced the four old interface definitions with the new names:
auto eno1
iface eno1 inet manual

auto eno2
iface eno2 inet manual

auto eno3
iface eno3 inet manual

auto eno4
iface eno4 inet manual
And updated the bond:
auto bond0
iface bond0 inet manual
    bond-slaves eno1 eno2 eno3 eno4
    bond-miimon 100
    bond-mode active-backup
    bond-primary eno1
I left the vmbr0 settings alone, preserving the existing Proxmox IP address and gateway. Then applied the configuration with:
ifreload -aThe active-backup bond came up, and the Proxmox web interface became reachable again. I opened https://192.168.0.141:8006.
And there was my Proxmox management interface.
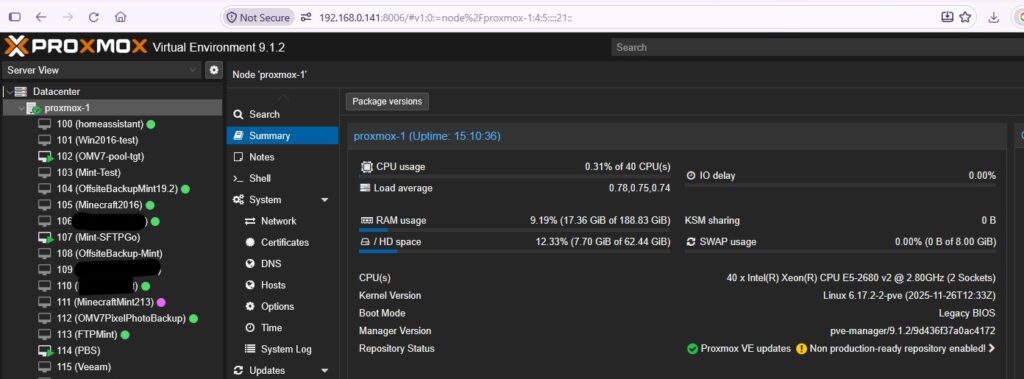
No reinstall, no restore of VM configurations, and no need to rebuild the storage definitions.
And PBS Was Back, Too
Remember that this entire rabbit hole started because I noticed the PBS backups weren’t displaying? Once Proxmox networking was restored, the PBS backup listings became accessible again. That was a very encouraging result, because it indicated that the backup infrastructure had survived the host failure.
I first confirmed that another VM, VM 209 on my other Proxmox host, could complete a backup. The task finished with:
INFO: backup was done incrementally, reused 60.50 GiB (94%)
INFO: transferred 4.76 GiB in 82 seconds (59.4 MiB/s)
INFO: Finished Backup of VM 209 (00:01:29)
INFO: Backup job finished successfully
TASK OK
The 94% reuse figure was particularly nice to see. The job wasn’t merely connecting to PBS; it was continuing to use the existing backup history.
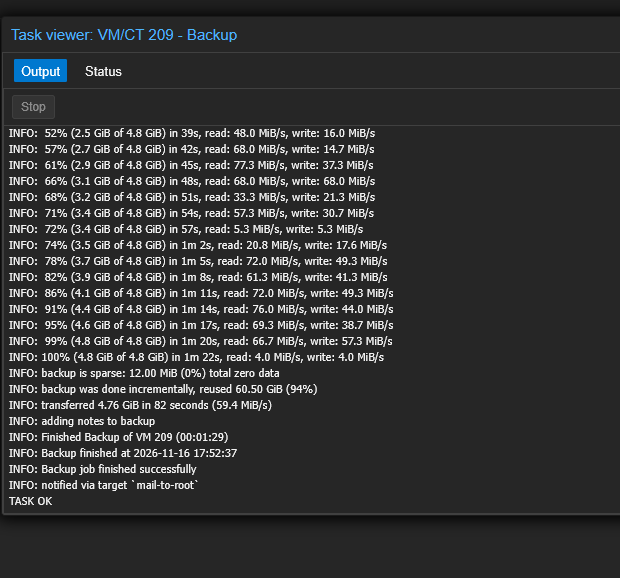
That still left one important test. I wanted to know whether a VM running on the recovered R720 itself could back up successfully, so I started a backup of VM 107, my Mint-SFTPGo virtual machine.
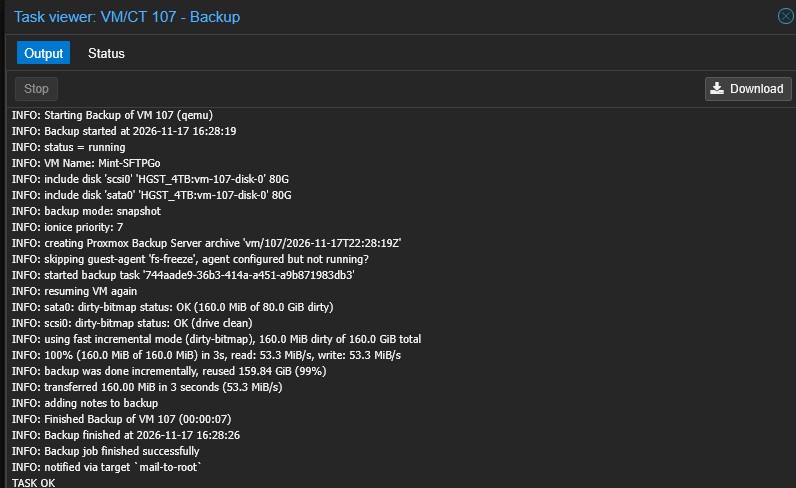
The backup completed successfully, processing both 80GiB virtual disks and reusing 159.84GiB (99%) of the existing backup data. Only 160MiB needed to be transferred, and the entire job finished in seven seconds.
That confirmed the recovered R720 could read its VM storage and communicate with PBS, using the existing backup history rather than starting over.
Making the Replacement Server the Permanent Host
The spare R720 had originally used 192.168.0.129 for iDRAC and 192.168.0.130 for its operating system. The failed machine’s Proxmox installation used 192.168.0.141, which I’d already preserved when bringing it up on the replacement chassis.
I also wanted to restore the original iDRAC address of 192.168.0.139 so I wouldn’t have to update my Home Assistant dashboard, bookmarks, or anything else referencing it. With the failed R720 already disconnected and sitting on the basement floor, I changed the replacement server’s iDRAC address to .139. This didn’t affect Proxmox’s IP address or its running virtual machines.
After the change, my Home Assistant dashboard was again showing .139, this time representing the replacement R720. And the readings looked good.
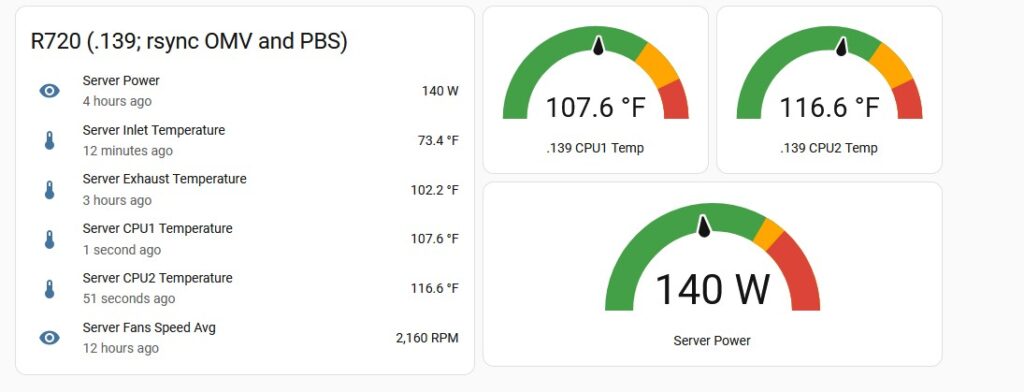
The old spare’s history included thermal throttling warnings, so I’ll continue watching its CPU temperatures and iDRAC event logs.
What Actually Failed?
That’s still an open question, at least at the component level. Here’s what I know.
The original R720 began exhibiting severe filesystem I/O errors. Its EXT4 journal aborted, and the root filesystem was remounted read-only, leaving the host impossible to manage normally. After restarting, the BIOS reported a previous fatal PCI Express error and could no longer find a boot device. iDRAC stopped detecting the PERC H710 Mini and all eight drives, and reseating the controller didn’t restore it.
When those same eight drives were installed in another R720 with a functioning H710 Mini, the controller recognized all four RAID configurations immediately. All four imported arrays were Optimal. The Proxmox root filesystem required journal recovery and a small metadata correction, but a subsequent full check was clean. Then the installed Proxmox system booted successfully.
Taken together, that evidence strongly suggests a failure involving the original server’s RAID controller or its motherboard connection. I still can’t say with certainty whether the H710 itself failed or whether the motherboard stopped communicating with it.
And I’m not willing to declare the actual drives perfectly healthy merely because the RAID arrays reported Optimal. I intend to review drive health and watch for additional errors.
But the migration demonstrated that all eight drives could be recognized and that the existing data structures were sufficiently intact to bring the server back into operation.
What About the Purchased Replacement H710?
The replacement PERC controller I ordered is no longer necessary for the immediate recovery. I may eventually use it to test the failed chassis, particularly to establish whether the original H710 or motherboard was responsible. It is not an immediate need, and sounds like a winter project. For now, the failed server can remain powered down.
A Few Things This Adventure Reinforced
1. A Healthy RAID Status Doesn’t Mean the Entire Storage Path Is Healthy
Initially, iDRAC showed the virtual disks and physical drives as Online. After the restart, it couldn’t detect the controller at all. The RAID configuration on the drives had survived, but the host’s ability to communicate with them had not. When troubleshooting storage problems, the controller, its motherboard connection, and the disks themselves are separate potential failure points.
2. RAID Metadata Saved a Lot of Work
Because the H710 stores array configuration information on the drives, the replacement controller was able to recognize and import the existing RAID-1 arrays. I didn’t need to recreate the arrays or specify their membership manually. The critical step was to inspect the foreign configuration before importing it and to avoid clearing or initializing anything.
3. Bootable Isn’t the Same as Filesystem-Healthy
The imported SSD mirror was Optimal, but that didn’t tell me whether EXT4 had survived the aborted journal cleanly. Using the Proxmox installer in Debug Mode allowed me to check and repair the filesystem while it was unmounted. That was time well spent.
4. Old Boot Media Can Come Back to Haunt You
I genuinely wasn’t expecting to see VMware ESXi 5.5 again. But the retired R720 still had its old installation on the internal SD module, and its BIOS was configured to boot that device before the RAID controller. Correcting the hard-disk boot sequence solved that problem without touching either installation.
5. Moving a Linux Installation to Different Hardware May Require Network Changes
Proxmox booted successfully but wasn’t accessible because the existing bond referenced interface names that didn’t exist on the replacement machine. Changing nic0–nic3 to eno1–eno4 restored the bond and the web interface. For a system with multiple physical interfaces, especially a bonded network, this is something to anticipate when replacing a motherboard or moving the operating-system disks to another chassis.
6. Keep Your Old Maintenance Notes
I had only a vague recollection of why I’d decommissioned the spare R720. Old notes explained the improperly seated PCIe NIC in slot 5, a previous overheating problem, and the period when the machine was moved from ESXi to Proxmox. That didn’t prove the spare was perfect, but it gave me much better context for interpreting its historical iDRAC errors. Without those notes, I might have rejected a perfectly usable replacement chassis because of warnings I couldn’t explain.
7. Backups Matter Even When You Don’t End Up Restoring Anything
This recovery didn’t require restoring the Proxmox installation or its VMs from backup, but having PBS and other backup copies available made the decision to troubleshoot and repair much less frightening. I would have approached the situation differently if the data on those arrays represented my only copies.
Now that the system is running again, my next priorities are to verify the remaining scheduled backups, check the offsite replication, and ensure I have a current copy of the Proxmox host configuration.
Commands Used During Troubleshooting
For reference, here’s a consolidated list of the commands involved in this recovery. Some were diagnostic tests that failed; others were run from the Proxmox installer rather than the installed operating system.
Windows: Network and Management Checks
ping 192.168.0.141

Test-NetConnection 192.168.0.141 -Port 8006

Test-NetConnection 192.168.0.141 -Port 22

curl.exe -k -v --connect-timeout 5 --max-time 12 https://192.168.0.141:8006/api2/json/version

ssh root@192.168.0.141

Test-NetConnection 192.168.0.105 -Port 8007

Test-NetConnection 192.168.0.246 -Port 80

Test-NetConnection 192.168.0.241 -Port 80
Failed Proxmox Host: Filesystem and Reboot Attempts
findmnt -no SOURCE,FSTYPE,OPTIONS /

dmesg -T | grep -Ei 'I/O error' | tail -n 80

systemctl reboot

sync
Several of these failed because the installed operating system was experiencing filesystem I/O errors.
Proxmox Installer Debug Mode: Storage Identification
In the first debugging shell, lsblk was unavailable, so I used exit once to advance to the later debugging shell.
lsblk

lsblk -f /dev/sdb

findmnt /dev/mapper/pve-root
The last command returned no mounted filesystem, confirming the volume was not mounted.
EXT4 Filesystem Checks and Repair
# Read-only check: no repairs
e2fsck -fn /dev/mapper/pve-root

# Interactive repair, including journal recovery
e2fsck -f /dev/mapper/pve-root

# Second check to confirm the filesystem is clean
e2fsck -f /dev/mapper/pve-root
Important: /dev/mapper/pve-root was the correct root filesystem on this installation. Device paths and filesystem layouts should be verified before using these commands on another system. Never run a writable e2fsck against an actively mounted root filesystem.
Rebooting From the Installer Debug Shell
# Normal reboot attempt, which failed because systemd was not PID 1
reboot

# Forced reboot approach for the installer environment
sync
reboot -f
Recovered Proxmox Host: Network Diagnosis
ip -br link

ip -br addr

cat /etc/network/interfaces

ip link set eno1 up

ip -br link show eno1

ethtool eno1 | grep -i "Link detected"
Network Configuration Recovery
# Preserve original configuration
cp -a /etc/network/interfaces /etc/network/interfaces.bak

# Edit the network interfaces and bond
nano /etc/network/interfaces

# Apply the revised configuration
ifreload -a
Additional useful validation commands discussed during recovery:
ip -br link show bond0

cat /proc/net/bonding/bond0

ping -c 3 192.168.0.1
The backup, configuration edit, and interface reload were followed by a working Proxmox web interface. The three additional validation commands above were suggested as checks, rather than individually verified in the captured screenshots.
Where Things Stand Now
The replacement R720 is running the original Proxmox installation. All eight drives are installed in their original bay positions, and all four RAID-1 virtual disks are Optimal. The EXT4 root filesystem has been repaired and passed a subsequent filesystem check.
The Linux bond is configured for the replacement server’s Intel network ports, and Proxmox’s web interface is accessible at its original IP address. PBS backup listings are visible again, a backup from the other Proxmox host completed successfully, as did a backup from the recovered host. The replacement hardware is also reporting comfortable CPU temperatures.
I still have a few things to check before I consider the recovery completely finished: the remaining VM backup results, storage health, offsite replication, and whether the spare R720 reports any new PCIe or thermal problems. But the main objective has been accomplished.
I recovered an existing Proxmox installation by transferring its eight drives into another Dell R720, importing the RAID configuration, repairing EXT4, and correcting the boot and network configurations.
I didn’t reinstall Proxmox, recreate the virtual machines, or have to restore everything from backup. The spare server had been sitting unused for more than a year, and it turned out to be exactly what I needed.
Which brings me back to the bathroom.
I had finished one project and was looking for something small to do next. Apparently, the home lab took that as an invitation.
And that’s how a missing Proxmox Backup Server turned into a full hardware migration.
Leave a Reply